WordPress loop: what it is, how to use and examples
Sep 10, 2025
/
Ignas R.
/
9 min Read
When it comes to developing and hosting a WordPress website, using the Loop can make the process much easier and more streamlined.
The WordPress Loop is responsible for fetching and displaying content on your website. In addition, you can use it to customize the content to your liking.
In this tutorial, we’ll explain what the WordPress Loop is, how it works, and its most common use cases. We’ll also go over the Query Loop block, find out how it differs from the regular WordPress Loop, and show how to use it on the block editor.
Download all-in-one WordPress cheat sheet
What Is the WordPress Loop?
The WordPress Loop is a core feature of the CMS, powering the dynamic content display. Generally speaking, it’s a PHP code block that retrieves posts, pages, and other types of content from the database and displays it on a WordPress website.
How the WordPress Loop Works
Whenever a user visits a WordPress site, the Loop retrieves its content from the database and displays it on the web page.
To do so, the Loop crawls the database for the needed content, including its title, date, text, and metadata. Then, the WordPress Loop formats it according to the specific criteria before displaying it on the site.
Let’s take a look at a simple WordPress Loop example:
<?php get_header(); ?>
<?php
if ( have_posts() ) : while ( have_posts() ) : the_post(); ?>
<?php the_title() ;?>
<?php the_author(); ?>
<?php the_post_thumbnail(); ?>
<?php endwhile; ?>
<?php endif; ?>
<?php get_footer(); ?>
Now, let’s see what each WordPress function is responsible for:
- get_header() and get_footer() – include a header and a footer in your post.
- if ( have_posts() ) – together with the have_posts() function, an if statement determines whether the current WordPress query has any posts for the display. It can either return true if the posts exist or false if there are no posts.
- while ( have_posts() ) – runs any specified WordPress code until no posts are left to Loop through.
- the_post() – in addition to preparing the post to be displayed, it checks and retrieves all relevant data.
- the_title(), the_author(), the_post_thumbnail() – the actual content you want to display. In our case, the post data will include the title, author, and post thumbnail. Usually, this part is also filled with HTML code for formatting.
The final endwhile and endif lines are for closing the while Loop and the if function.
Pro Tip
The Loop displays the_title(), the_time(), and the_category() WordPress template tags by default for every post.
Alternatively, use the following PHP code syntax for your WordPress Loop. While its functionality and the elements are the same, the syntax format differs.
<?php
get_header();
if ( have_posts() ) :
	while ( have_posts() ) : the_post();
	the_title();
	the_author();
	the_post_thumbnail();
	endwhile;
endif;
get_footer();
?>
How to Use the Loop in WordPress
In this section, we’ll provide a few straightforward examples of how to use the Loop in WordPress.

How to Hyperlink on the Post Title Using the Loop
Whenever you create a blog post, consider adding a hyperlink to its title for easier navigation.
To do so, use the following code with the_permalink() template tag:
<?php if ( have_posts() ) : while ( have_posts() ) : the_post(); ?>
           <h2><a href="<?php the_permalink(); ?>"><?php the_title() ;?></a></h2>
            <?php the_post_thumbnail(); ?>
<?php endwhile; ?>
<?php endif; ?>
How to Use the WordPress Loop to Show Content, Author, Date, and Category
If you want your post to include its author, date, category, and content, apply the following WordPress code:
<?php if ( have_posts() ) : while ( have_posts() ) : the_post(); ?>
           <h2><?php the_title() ;?></h2>
           <?php the_author(); ?> <?php the_time('F j, Y'); ?> <?php the_category(); ?>
           <?php the_post_thumbnail(); ?>
           <?php the_content(); ?>
<?php endwhile; ?>
<?php endif; ?>
How to Use Conditional Tags in the WordPress Loop
Conditional tags are a set of WordPress functions that determines how a website’s content will be displayed. Usually, theme developers add them to the template files to let users check various conditions that control the overall appearance of their sites.
For example, if you want to display content only on the homepage, use the is_home() conditional tag. Similarly, to show content only on a single post page, use the is_single() tag.
Here are the most common conditional tags in WordPress:
- is_front_page() – for a website’s front page.
- is_page() – for a WordPress page.
- is_category() – for a category archive.
- is_tag() – for a tag archive.
- is_archive() – for an archive page.
- is_search() – for a search results page.
- is_author() – for an author archive.
- is_404() – for is a 404 ff page.
Remember to set them as true for any page you want to use them on.
In the following example, we’ll use the is_front_page() tag with an if statement:
<?php if (is_front_page()) : ?>
        <?php if ( have_posts() ) : while ( have_posts() ) : the_post(); ?>
         <h2><?php the_title() ;?></h2>
           <?php the_post_thumbnail(); ?>
           <?php the_excerpt(); ?>

<?php endwhile; ?>
<?php endif; ?>
<?php endif; ?>
WordPress users can use the above code to display posts on the front page.
How to Customize the WordPress Loop Using Template Files
Customizing the WordPress Loop using template files requires modifying the PHP code in the theme’s files, including archive.php, index.php, category.php, and tag.php.
To customize the Loop, you can modify the query parameters, add or remove elements from it, or change the way it displays post content.
Pro Tip
We recommend creating a WordPress child theme to avoid losing modifications during updates.
Keep in mind that WordPress is shifting to block-based themes that no longer use PHP template files. As a result, you will need to use the Query Loop block for such WordPress themes.
However, using the WordPress Loop is necessary for non-block WordPress themes.
WordPress Loop Examples
In the following examples, we will add code to index.php of the Twenty Twenty theme template file.
Styling Posts From Categories Differently
You may want posts from various categories to be displayed differently. This can help readers differentiate your posts better.
The following example will display each post’s title, category, and content, letting you style posts from Category 3 differently.
Note that the following Loop example is from the official WordPress Loop documentation page and consists of useful code comments.
 <!-- Start the Loop. -->
 <?php if ( have_posts() ) : while ( have_posts() ) : the_post(); ?>
 	<!-- Test if the current post is in category 3. -->
 	<!-- If it is, the div box is given the CSS class "post-cat-three". -->
 	<!-- Otherwise, the div box is given the CSS class "post". -->
 	<?php if ( in_category( '3' ) ) : ?>
 		<div class="post-cat-three">
 	<?php else : ?>
 		<div class="post">
 	<?php endif; ?>
 	<!-- Display the entry Title as a link to the Post's permalink. -->
 	<h2><a href="<?php the_permalink(); ?>" rel="bookmark" title="Permanent Link to <?php the_title_attribute(); ?>"><?php the_title(); ?></a></h2>
 	<!-- Display the date (November 16th, 2009 format) and a link to other posts by this posts author. -->
 	<small><?php the_time('F jS, Y'); ?> by <?php the_author_posts_link(); ?></small>
 	<!-- Display the Post's entry content in a div box. -->
 	<div class="entry">
 		<?php the_content(); ?>
 	</div>
 	<!-- Display a comma separated list of the Post's Categories. -->
 	<p class="postmetadata"><?php _e( 'Posted in' ); ?> <?php the_category( ', ' ); ?></p>
 	</div> <!-- closes the first div box -->
 	<!-- Stop The Loop (but note the "else:" - see next line). -->
 <?php endwhile; else : ?>
 	<!-- The very first "if" tested to see if there were any Posts to -->
 	<!-- display.  This "else" part tells what to do if there weren't any. -->
 	<p><?php esc_html_e( 'Sorry, no posts matched your criteria.' ); ?></p>
 	<!-- REALLY stop The Loop. -->
 <?php endif; ?>
Inserting Ads After the First Post
With the WordPress Loop, you can easily insert ads into your posts. This is a great marketing strategy for monetizing your site.
In the following example, we’ll insert ads after the first post:
<?php if (have_posts()) : ?>
<?php $count = 0; ?>
<?php while (have_posts()) : the_post(); ?>
<?php $count++; ?>
  <?php if ($count == 2) : ?>
          //Ad code
          <h2><a href="<?php the_permalink(); ?>"><?php the_title(); ?></a></h2>
          <?php the_author(); ?>
   <?php else : ?>
          <h2><a href="<?php the_permalink(); ?>"><?php the_title(); ?></a></h2>
          <?php the_author(); ?>
  <?php endif; ?>
<?php endwhile; ?>
<?php endif; ?>
Remember to replace the Ad code part with the actual code.
Getting Posts Between Two Dates
For easier site management, you can easily filter out posts between two dates with the WordPress Loop. Check the code below:
<?php function filter_where($where = ’) {
        $where .= " AND post_date >= '2025-01-01' AND post_date <= '2025-03-01'";
    return $where;
  }
add_filter('posts_where', 'filter_where');
query_posts($query_string);
while (have_posts()) :
      the_post();
      the_content();
endwhile;
?>
Make sure to adjust 2025-01-01 and 2025-03-01 to your preference.
Displaying Posts Published a Year Ago
Reusing old content can be a great strategy for engaging new readers. Utilize the following code if you want to display posts you made a year ago.
<?php
$current_day = date('j');
$last_year = date('Y')-1;
query_posts('day='.$current_day.'&year='.$last_year);
if (have_posts()):
    while (have_posts()) : the_post();
       the_title();
       the_excerpt();
    endwhile;
endif;
?>
Listing Upcoming Posts
List upcoming posts to encourage users to visit your blog in the future. Check the code below for more information:
<?php query_posts('showposts=10&post_status=future'); ?>
<?php if ( have_posts() ) : while ( have_posts() ) : the_post(); ?>
    <h2><?php the_title(); ?></h2>
    <span class="datetime"><?php the_time('j. F Y'); ?></span></p>
<?php endwhile;
else: ?><p>No future posts scheduled.</p>
<?php endif; ?>
Displaying the Latest Sticky Posts
If you want to display only the latest sticky posts, refer to the code below:
<?php
$sticky = get_option('sticky_posts');
rsort( $sticky );
$sticky = array_slice( $sticky, 0, 5);
query_posts( array( 'post__in' => $sticky, 'caller_get_posts' => 1 ) );

if (have_posts()) :
    while (have_posts()) : the_post();
        the_title();
        the_excerpt();
    endwhile;
endif;
?>
Making an Archive Page
An archive page is a collection of your previously published posts. Easily display popular posts from the past for your web page visitors.
To create it, refer to the code below:
<?php
/*
Template Name: MyArchives
*/
?>
<?php get_header(); ?>
  <h2><?php $numposts = $wpdb->get_var("SELECT COUNT(*) FROM $wpdb->posts WHERE post_status = 'publish'");
if (0 < $numposts) $numposts = number_format($numposts); ?>
<h2><?php echo $numposts.' recipes published since January 01, 2025'; ?>
  </h2>
  <ul id="archive-list">
    <?php
    $myposts = get_posts('numberposts=-1&');
    foreach($myposts as $post) : ?>
      <li><?php the_time('m/d/y') ?>: <a href="<?php the_permalink(); ?>"><?php the_title(); ?></a></li>
    <?php endforeach; ?>
  </ul>
<?php get_sidebar(); ?>
<?php get_footer(); ?>
Understanding the WordPress Query Loop Block
One of the most significant updates to the WordPress Loop is the introduction of the Query Loop block. Without further ado, let’s find out what it is and how to use it.
What Is the Query Loop Block
Introduced in WordPress 5.8, the WordPress Query Loop block is a powerful addition to the basic Loop feature. The Gutenberg editor uses it for displaying posts on your website.
With the WordPress Query Loop block, you can easily create complex and visually appealing WordPress post formats that display content in a specific order. To do so, you can apply various filters such as category, tag, or date.
In other words, the Query Loop block is like the PHP Loop but without actual code. This way, you can use the block editor to easily customize how content is displayed on the website by specifying which posts or pages should be shown and in what order.
How to Use the Query Loop Block in WordPress
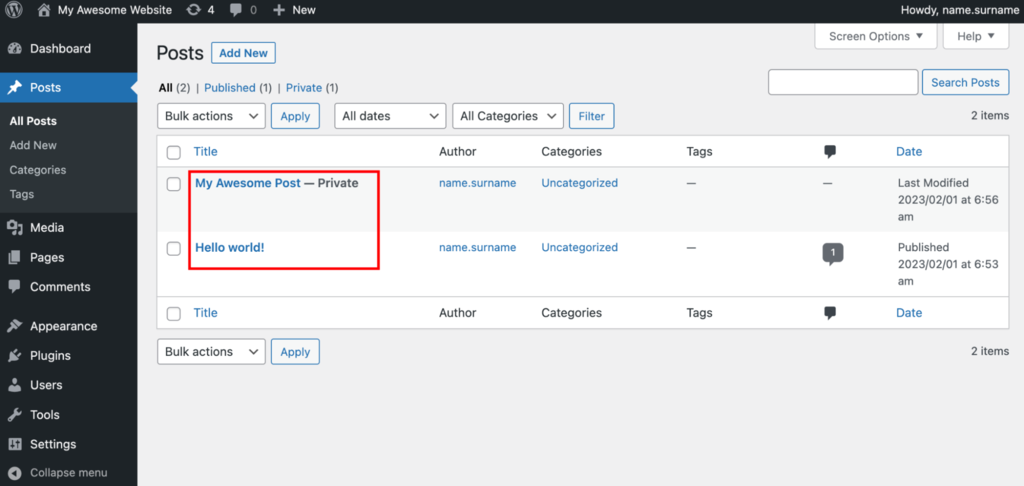
To add the Query Loop block, open or add new WordPress posts in the block editor:
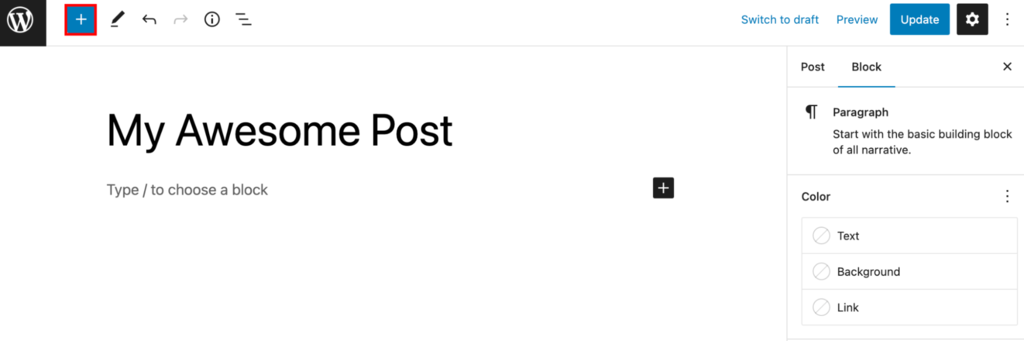
Once in the editor, select the block inserter icon:
Search for the Query Loop and click on it:
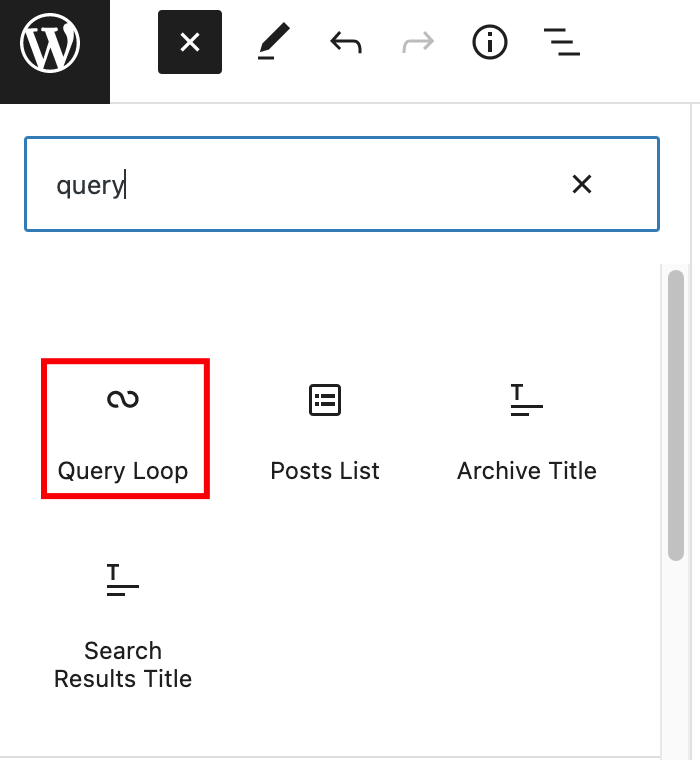
That’s it – a new Query Loop block will be added to your post. Now, check the following section for customizing it.
Customizing the Query Loop Block
Whenever adding a new Query Loop block, you will see two options:

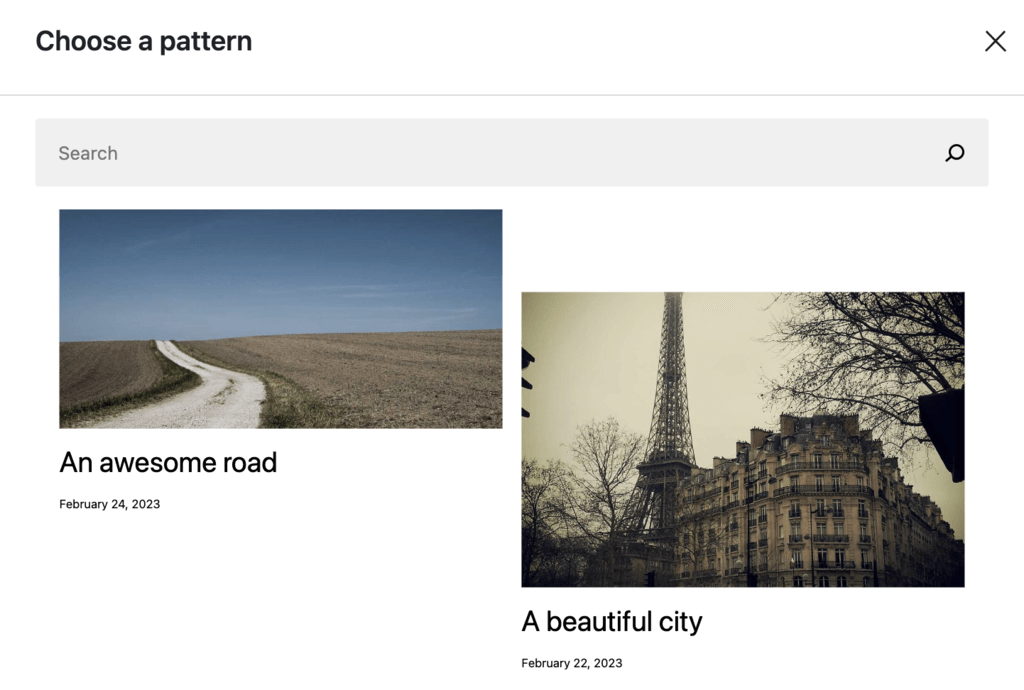
Choose
The Choose option lets you select between a variety of different patterns. Just pick one that you prefer.
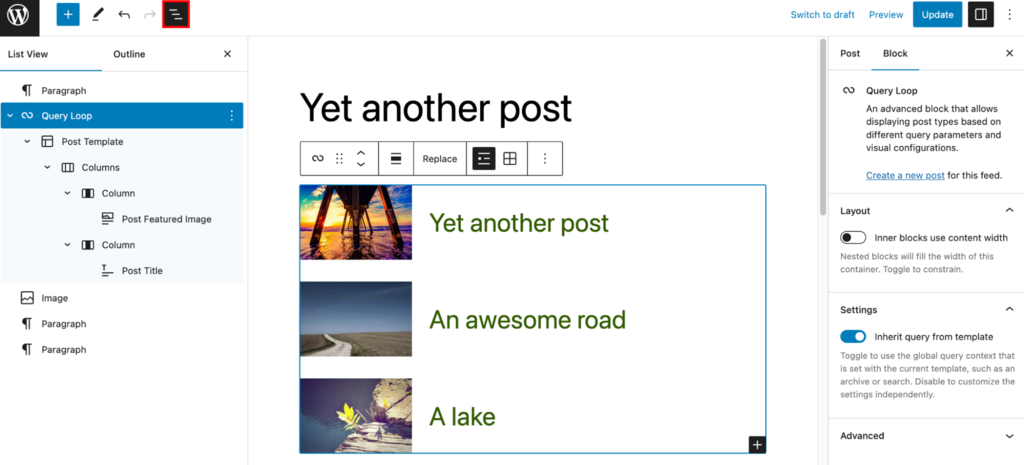
Remember that each Query Loop block consists of various nested blocks, like Post Title or Excerpt. Open the Document Overview tool if you are wondering which blocks are used within the Query Loop block. Here you will see all of the nested blocks and will be able to navigate between them:
Start Blank
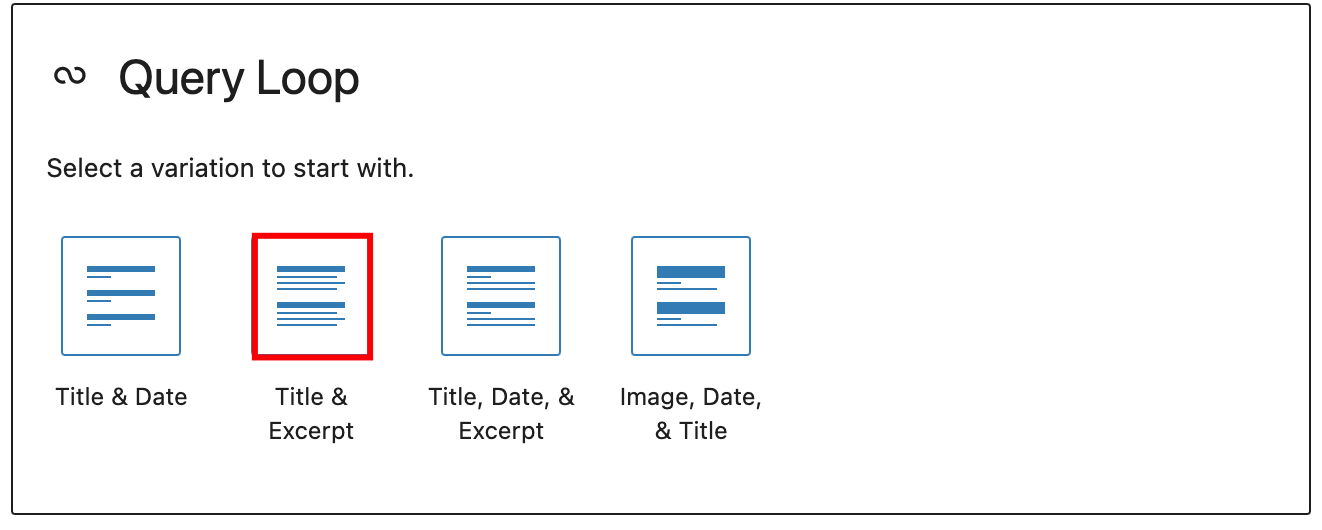
In the Start blank option, you will see various templates. Select the one you prefer. For this example, we’ll add the template with Post Title and Excerpt:
After adding the Query Loop block, you can customize it using the block toolbar or block settings section. Let’s cover each of them.
Block Toolbar
The Block toolbar is the main tool to customize any block on WordPress, including the Query one.

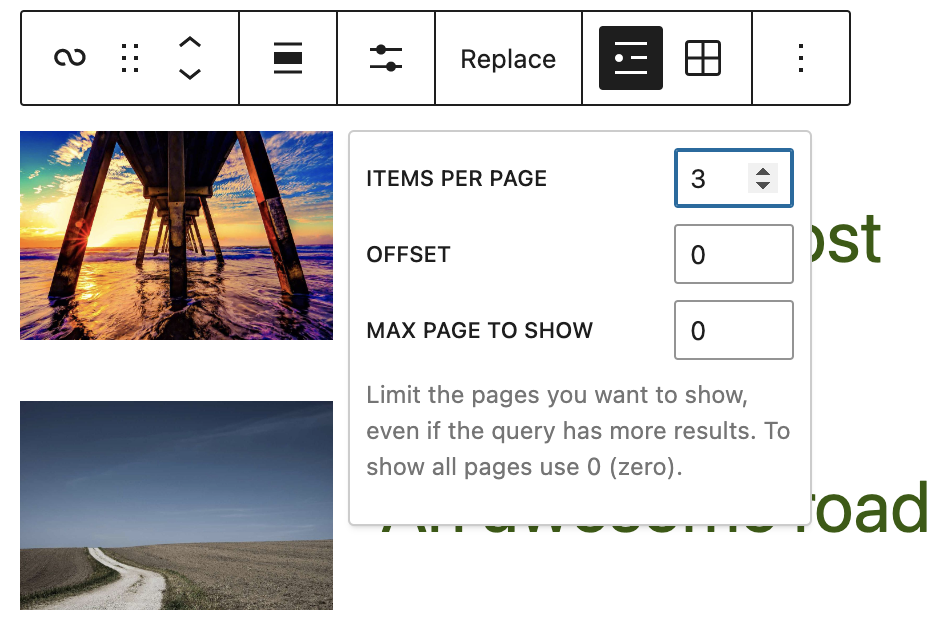
Here you can convert the Query Loop to Columns or Group blocks, move it around the editor, adjust the alignment, or change the default view. The most notable options are Display settings and Replace:

Display settings let you choose how many WordPress posts to show and set how many of them should be skipped before displaying preferred content.
If you do not see Display settings, ensure that Inherit query from template option is disabled in the Block Settings section.
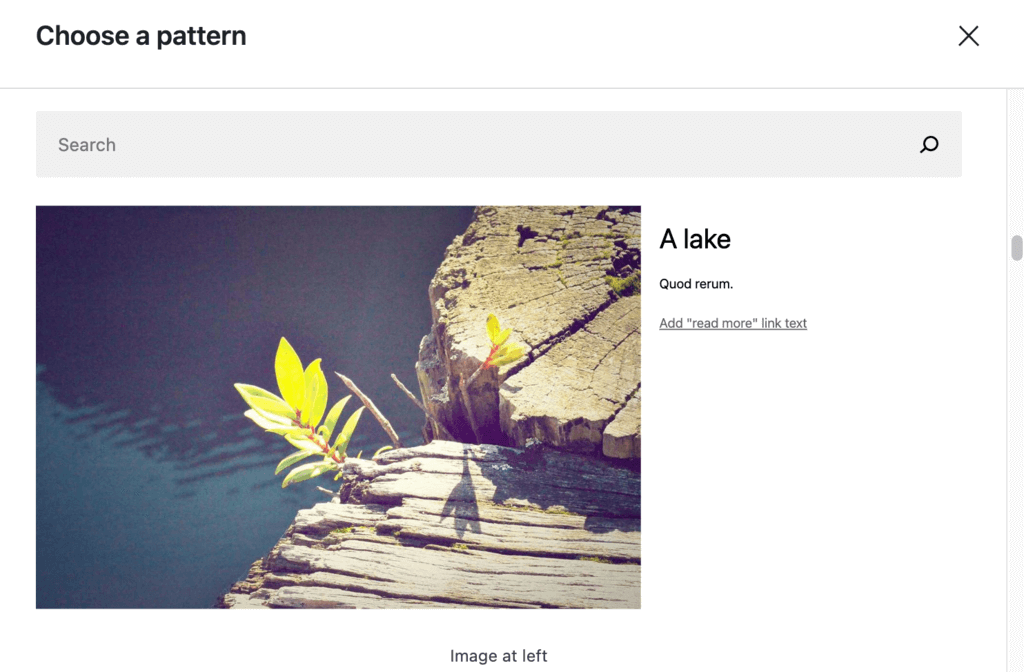
Another useful WordPress function is Replace. With it, you can easily replace the current pattern with any other one:
Block Settings
Other important block settings can be found by clicking the Settings button on the upper right corner of the editor:
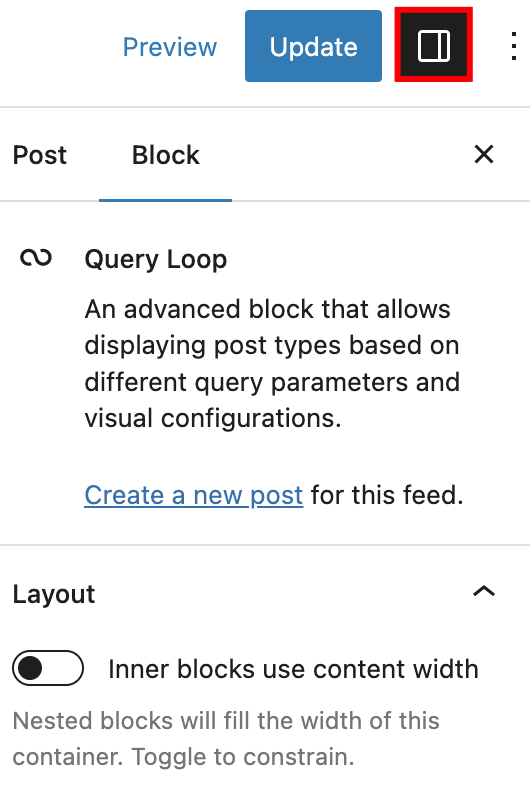
Here you will be able to customize the Query Loop’s layout, filter the posts, or add any custom CSS classes to your block.
Suggested Reading
Check out the official documentation for the Query Loop block if you need more information.
Query Loop Pagination
The query loop block will display your blog posts on several pages when you have many posts on your site. Thus, you may see the page numbers block inside a query loop.
If you select this block and open the block settings panel, you’ll be able to change the number of pages displayed for the viewers. This way, you can show links to more pages and let visitors jump between pages quickly.

Conclusion
The WordPress Loop can benefit any website since it arranges the way to display posts, helping you stand out from the crowd.
Don’t worry if you’re not familiar with coding – with the introduction of the Query Loop block, you can utilize the block editor to display your WordPress posts as you wish.
However, using the Loop is still necessary for developing a non-block WordPress theme. We hope you found this tutorial useful. If you have any questions, refer to our WordPress guide or leave a comment below.
All of the tutorial content on this website is subject to Hostinger's rigorous editorial standards and values.

Ignas takes great satisfaction in helping people tackle even the most complex technical issues. His current goal is to write easy-to-follow articles so that these issues will not happen at all. During his free time, Ignas likes to play video games and fix up things around his house.


