Presenting UX Ideas to Designers in Their Language

Have you ever had a fantastic UX idea that you thought would improve your product but it was never implemented because when you talked to the designers no one could understand what you had exactly in mind? In this article, I will cover a few simple steps you can take that will help make your UX idea pitch easier to understand for UX designers.
Speaking Fluent UX
Let’s cover the basic elements that are a must when you’re preparing to present your ideas to the design team:
1. Learn Some UX Terminology
UX terms can sound like a different language to non-designers. Whether you’re a stranger to the field or working with pros, it’s recommended to learn how to speak User Experience and designer. You must understand these terms:
- UX research – this is where you study a product’s users, learn what their needs are, analyze how the current user experience serves them, and determine how to improve it based on the findings.
- A/B testing – here, you take two (A and B) or more versions of your site or app, present them to your target audience, and see which one they statistically prefer.
- Heat maps – this UX tool tracks and records the user’s mouse pointer and display position when they’re on your site to gain insight into their behavior.
- Information architecture – this is the thought process responsible for arranging apps, software, site sections, or even actual rooms and galleries to improve how they’re used or viewed.
- UX iteration – it requires constant prototyping, sharing versions with users, doing interviews with them, and adjusting or reworking your design based on what was learned.
- Journey mapping – here you create a visual mockup of the user’s journey while using your site or product, with the help of the data collected during UX research. This practice is also called Customer Journey Mapping.
- Personas – they are carefully crafted user profiles made-up by UX designers to help understand and relate to the type of user a product is developed for.
- Wireframes – basic blueprints that show the base sections and layout of a site or web application.
- Prototype – when compared to a wireframe, a prototype is at a later stage of development and serves as a test version of your creation used for research prior to final release.
- Usability testing – a practice that gives users variations of a site or app to try while UX researchers watch, study, and take notes as users complete tasks with different versions of the tool.
Knowing these terms might ease your conversations or even help save time. Also, the design team will be more eager to talk UX to you if you speak their language.
2. Do Your Research
“UX without user research is not UX,” said Don Norman, the person behind the term “user experience.” Usually, research is the first logical step to take when working on UX projects. The type of research that you should do solely depends on what problem you are trying to solve. The better you know the problem and who your solution would benefit the most, the more clearly you’ll be able to communicate it to others.
Designers love well-done research and precise facts, so when you’re trying to communicate your ideas to them, they might ask you for the data backing up your claims. This is where having done research beforehand will benefit the conversation greatly.
3. Get Comfortable Sketching on Paper
Most people are visual creatures. So the quickest way to communicate ideas is to sketch them out. You’re probably thinking, “I can’t draw, and you said this tutorial was for non-designers.” Don’t worry – if you can write, draw a line or a shape that looks like a rectangle, you’re entirely qualified to make user interface sketches.
For sketching out your ideas, you will need a few things. First of all, get some paper or a notepad, a thick marker, and a timer. Thick markers help focus on the big picture instead of sketching out all the shadows and fancy UI elements that you envision. Keep your focus entirely on the depiction of your idea.
Secondly, try to sketch as many ideas as you can without judging any of them just yet. That is why having a timer is so important. It helps you set up time constraints, so you have to think quickly without judging your ideas too much.
Lastly, give the most attention to the copy you write. Text is the most crucial element in design sketches because it provides a purpose to a drawing and makes it much more understandable.
Remember – when drawing your ideas during this step, quantity is more important than quality, so set a timer for 30 minutes or whatever time you’ve got and try to jot down as many ideas as you can. We’ll review them later.
The Four-Step Sketching Process
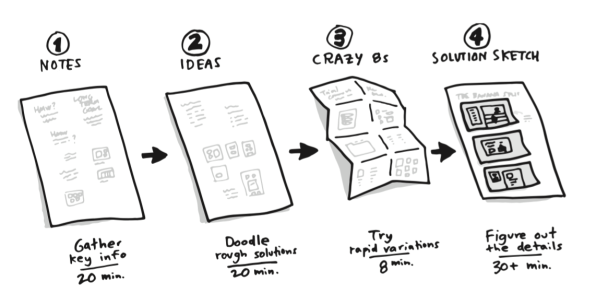
Everything becomes more comfortable when following a process. So here is one for your sketching session so you don’t get carried away. I’ve borrowed this method from “Design Sprints” by Jake Knapp.
- Start with setting your timer for twenty minutes and taking notes of the goal, opportunities, and inspiration you’ve collected earlier during research.
- Set another twenty minutes to sketch rough ideas to form your thoughts.
- Crazy 8’s. Take the one solution that you think is the strongest. Divide an A4 page into eight rectangles by folding, and in those rectangles, sketch out eight different variations of your most potent idea. Give one minute for each sketch.
- Finally, give yourself up to 40 minutes on the timer to sketch an end-to-end final solution before presenting it to your peers and the designers.
Why You Should Follow This Sketching Process
By sketching out different ideas on paper and iterating them, you’ll have enough material to present clearly and get actionable feedback. This way, everyone can see what your thought process was. Also, by doing this, you’ll make it easy for others to spot potential in other ideas that you may have missed.
Get Some Feedback
The time has come to put your idea out there for the whole team to see. Pick a way to present your design. It could be a post in a Slack group, a comment on your virtual scrum board, or a live feedback session with real people where you arrange your work as an art gallery for everyone to see.
The presentation method is up to you. Note that communicating in person always works faster and better than virtual communication.
Ideally, when hosting feedback sessions, you should try to invite people from different departments. Try to limit the feedback group to just one designer and invite stakeholders, marketers, customer success agents, etc. to have as many different outlooks as possible.
Take notes on the feedback, iterate, and repeat the feedback process until you feel the idea is ready for the design team to work on.
Conclusion
By the time you’re done with this idea generation process, you should have a clear understanding of what you’re trying to solve or improve, who your idea benefits, and, most importantly, the possible actionable solution that might be implemented.
Now you can approach the design team with confidence and start sharing your ideas. Keep doing this, and the team will love you forever – take this from a designer.

Web Designer @ Hostinger. Building a Unicorn through good UX.