How to configure an NGINX reverse proxy
Sep 22, 2025
/
Ariffud M.
/
7 min Read
NGINX is a high-performance web server widely recognized for its stability, rich features, and low resource consumption. As a reverse proxy, it acts as an intermediary for client requests to back-end servers, enhancing the security, performance, and scalability of web applications.
In this article, you’ll learn about the NGINX reverse proxy server, its role in modern web architectures, and the steps to set it up. We’ll guide you through the installation and configuration process to ensure your applications run more efficiently and securely.

What Is an NGINX Reverse Proxy?
An NGINX reverse proxy is a server configuration that directs incoming traffic to various back-end servers based on URL, ensuring efficient load distribution and resource accessibility.
An NGINX reverse proxy server extends beyond simple traffic redirection, playing a crucial role in boosting web application performance. It adeptly manages both dynamic and static content, routing them to suitable servers for optimal processing and delivery.
With NGINX Plus, users gain access to enhanced features such as superior load balancing, extensive monitoring capabilities, and strengthened security measures.
In Kubernetes environments, NGINX excels as an ingress controller, orchestrating external access to services – a key component in deploying scalable cloud-native applications.
Furthermore, NGINX enhances network efficiency through its API gateway functionality, which simplifies network traffic management and ensures reliable routing to upstream services.
Suggested Reading
Learn how to temporarily and permanently redirect traffic using NGINX with our comprehensive guide.
How Does an NGINX Reverse Proxy Work?
At its core, the NGINX reverse proxy acts as a bridge between client devices and back-end servers, such as LiteSpeed or Apache, managing incoming requests in a reverse proxy setup.
Request Handling Process
When a client device sends HTTP requests to your web application, these requests first reach the NGINX reverse proxy server. NGINX then examines the request’s details, such as URL and headers, to determine the appropriate handling.
For static content requests, NGINX optimizes delivery by serving content from its cache, significantly reducing load times. Meanwhile, dynamic content requests requiring real-time processing are forwarded to the appropriate back-end server.
Decision-Making for Back-End Server Forwarding
NGINX uses various load balancing methods to decide which back-end server to forward requests to, such as:
- Round robin. Distributes requests evenly across all servers, preventing any single server from becoming overloaded.
- Least connections. Sends requests to the server with the fewest active connections, which is suitable for long-lived connections.
- IP hash. Allocates requests based on client IP addresses, ensuring the user consistently interacts with the same server, which can be helpful for session persistence.
Advanced Configurations
For complex scenarios, you can configure NGINX rules based on request headers, content type, and even custom code modules, allowing for precise forwarding decisions.
This adaptability enables NGINX to efficiently direct traffic to web and application servers and functions as a forward proxy for outgoing requests when configured to do so.
Prerequisites for Configuring an NGINX Reverse Proxy Server
Before setting up an NGINX reverse proxy on a virtual private server (VPS), ensure you have the following essentials in place for a smooth and effective configuration:
- Server access. You’ll need root or sudo access to your VPS to install software and modify configuration files.
- Domain name. Ideally, you should have a domain name pointing to your VPS’s IP address. This setup enables access to your NGINX reverse proxy server using a domain name instead of just a single IP address.
- Back-end servers. A reverse proxy’s primary function is to route traffic to one or more back-end servers, such as an Apache server. Ensure your back-end servers are correctly configured and running before proceeding with the NGINX reverse proxy setup.
- Network configuration. Your VPS should be configured to allow HTTP and HTTPS traffic. Adjust your firewall settings to permit connections on port 80 (HTTP) and port 443 (HTTPS).
- Understanding of NGINX configuration. Familiarize yourself with NGINX’s default configuration syntax, as setting up reverse proxies involves modifying configuration files.
- SSL certificates (optional but recommended). For HTTPS connections, consider obtaining an SSL certificate for your domain. Encryption secures the data transmitted between the client and the reverse proxy.
How to Set up NGINX as a Reverse Proxy
We’ll guide you through configuring an NGINX reverse proxy on a Hostinger VPS running an Ubuntu 22.04 distribution. It should work on later versions of Ubuntu as well.

1. Install NGINX
To set up an NGINX reverse proxy, you first need to install the NGINX server on your VPS. Follow these steps to get NGINX up and running:
- Open PuTTY or your preferred SSH client and log in to VPS using your credentials.
- Update and upgrade your server’s packages to avoid potential conflicts and ensure you have the latest security patches with these Linux commands:
sudo apt update
sudo apt upgrade -y
- Install the latest version of NGINX using the package manager by running:
sudo apt install nginx -y
- NGINX should start automatically after installation. To verify that NGINX is running, use:
sudo systemctl status nginx
The output should indicate that the NGINX service is active (running), similar to the following example:
● nginx.service - A high performance web server and a reverse proxy server
   Loaded: loaded (/lib/systemd/system/nginx.service; enabled; vendor preset: enabled)
   Active: active (running) since Wed 2025-01-01 12:34:56 UTC; 2min 22s ago
     Docs: man:nginx(8)
 Main PID: 1234 (nginx)
    Tasks: 2 (limit: 1152)
   Memory: 5.3M
   CGroup: /system.slice/nginx.service
           ├─1234 nginx: master process /usr/sbin/nginx -g daemon on; master_process on;
           └─1235 nginx: worker process
If your VPS has a firewall configured, you also need to allow traffic to NGINX. For Uncomplicated Firewall (UFW) systems, enable traffic on appropriate ports with:
sudo ufw allow 'Nginx Full'
2. Configure the File Structure
When you’re installing NGINX, the system automatically sets up several essential directories and files for its configuration and operation.
Organizing NGINX configuration files is crucial for tailoring its functionality to suit specific needs, such as managing diverse workloads and efficiently directing requests to several servers.
Basic NGINX Configuration File Structure
The core configuration file for NGINX is nginx.conf, found in /etc/nginx/. This file contains global settings and includes directives to pull in additional configurations from other files and directories:
- /etc/nginx/nginx.conf. The main NGINX configuration file.
- /etc/nginx/sites-available/. Stores potential virtual host configurations. Each file here represents a distinct site, which can be individually enabled or disabled.
- /etc/nginx/sites-enabled/. Contains symbolic links to the configurations in sites-available that you wish NGINX to use. Only the configurations linked in this directory are active.
- /etc/nginx/conf.d/. Generally holds global configurations applicable to all sites. Files ending in .conf within this directory are automatically included in the main NGINX configuration.
Important NGINX Directives
To effectively utilize NGINX, you need to familiarize yourself with its key directives:
- server. Defines a server block – each server block can host a website or a part of a website. It includes directives like listen and server_name.
- location. Defines how to process requests for different resources within a server block. Location blocks can specify web content and proxy settings.
3. Set up NGINX as a Reverse Proxy
To configure NGINX as a reverse proxy, you need to create a new configuration file. This file will contain the server blocks and directives needed for routing requests. Follow these steps:
- Navigate to the configuration directory:
cd /etc/nginx/sites-available/
- Use a text editor like nano to create a configuration file named after your site, for instance:
sudo nano example.com
- In the NGINX configuration file, set up the server to listen on port 80, using the proxy_pass directive to forward proxy requests to your back-end server:
server {
    listen 80;
    server_name example.com;
    location / {
        proxy_pass http://your_backend_server_ip;
        proxy_set_header Host $host; # Forwarded host
        proxy_set_header X-Real-IP $remote_addr;
        proxy_set_header X-Forwarded-For $proxy_add_x_forwarded_for;
        proxy_redirect off;
    }
}
Replace your_backend_server_ip with your back-end server’s actual IP address.
Configuring Load Balancing
To set up a load balancer, define an upstream block and use proxy_pass within your server block to distribute traffic among multiple servers:
upstream myapp1 {
    server backend1.example.com;
    server backend2.example.com;
}
server {
    listen 80;
    server_name example.com;
    location / {
        proxy_pass http://myapp1;
        proxy_next_upstream error timeout;
        # Additional settings...
    }
}
Handling Static Content
For efficiency, serve static content directly from NGINX using a separate location block:
server {
    listen 80;
    server_name example.com;
    location / {
        proxy_pass http://your_backend_server_ip;
        # Proxy settings...
    }
    location /static/ {
        root /path/to/static/files;
        expires 30d;
    }
}
Fine-Tuning Proxy Directives
Customize how NGINX interacts with your proxied servers using various proxy_ directives to enhance performance and manage proxied requests effectively:
- proxy_pass. Specifies the protocol and address of the proxied server. Here’s the basic usage for forwarding requests based on the request URI:
location / {
    proxy_pass http://backend.example.com;
}
- proxy_set_header. Modifies or adds headers to the request sent from the origin server, ensuring it receives all necessary information about the original request:
location / {
    proxy_pass http://backend.example.com;
    proxy_set_header Host $host;
    proxy_set_header X-Real-IP $remote_addr;
    proxy_set_header X-Forwarded-For $proxy_add_x_forwarded_for;
    proxy_set_header X-Forwarded-Proto $scheme;
}
- proxy_cache. Enables caching responses from the proxied server. Configure along with proxy_cache_path to define cache parameters:
http {
    proxy_cache_path /path/to/cache levels=1:2 keys_zone=my_cache:10m max_size=10g inactive=60m use_temp_path=off;
    server {
        location / {
            proxy_pass http://backend.example.com;
            proxy_cache my_cache;
        }
    }
}
- proxy_buffering. Controls response buffering – turning it off can reduce latency for specific use cases:
location / {
    proxy_pass http://backend.example.com;
    proxy_buffering off;
}
- proxy_ssl. Ensures secure connections to the proxied server with SSL encryption:
location / {
    proxy_pass https://backend.example.com;
    proxy_set_header X-Forwarded-Proto https;
}
- proxy_buffer_size. Specifies the buffer size for the first part of the response:
location / {
    proxy_pass http://backend.example.com;
    proxy_buffer_size 4k;
}
- Proxy timeouts. Set timeouts for connection establishment, reading, and sending data to the proxied server, respectively:
location / {
    proxy_pass http://backend.example.com;
    proxy_connect_timeout 60s;
    proxy_read_timeout 60s;
    proxy_send_timeout 60s;
}
4. Test the NGINX Reverse Proxy
Once done with your NGINX reverse proxy configuration; it’s time to enable the settings, test for syntax errors, and apply the changes. Here are the steps:
- Create a symbolic link from your configuration file in sites-available to sites-enabled to activate it:
sudo ln -s /etc/nginx/sites-available/example.com /etc/nginx/sites-enabled/
- Test NGINX to avoid service disruption from possible misconfigurations:
sudo nginx -t
Alternatively, Hostinger VPS customers can use Kodee to confirm their NGINX configuration. Open the Kodee AI Assistant menu from your VPS dashboard’s left sidebar, then type your prompt like this:
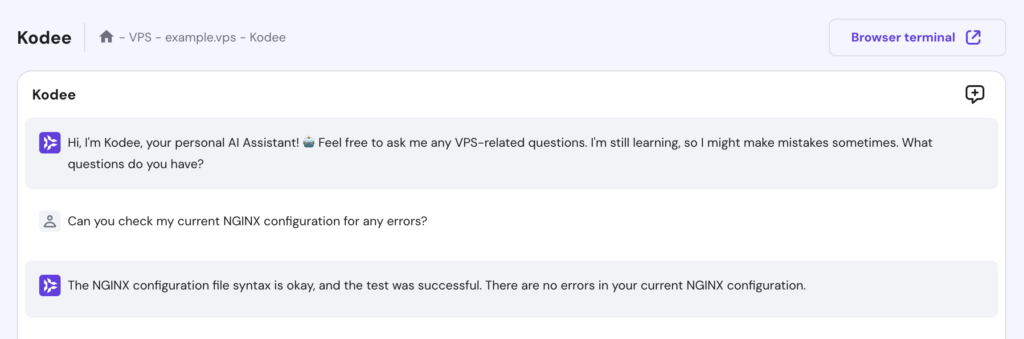
If any NGINX reverse proxy issues are detected, it will indicate where they are, so you can troubleshoot and correct the errors.
Reload or Restart NGINX
To apply your configuration changes, you can either reload or restart the NGINX server.
- Reload NGINX. Generally preferred as it applies changes without dropping existing connections:
sudo systemctl reload nginx
- Restart NGINX. If necessary, you can fully restart NGINX, though this will briefly interrupt the service:
sudo systemctl restart nginx
Restarting is sometimes required for more significant changes or troubleshooting NGINX errors.
Conclusion
In this guide, you’ve learned how to set up NGINX as a reverse proxy server, covering installation, configuration, and testing.
By managing and distributing incoming requests evenly, you ensure your server is optimally utilized, and your web applications run smoothly. Use these steps as a starting point to enhance the performance, security, and scalability of your server environment with NGINX.
NGINX Reverse Proxy FAQ
This section will answer the most common questions about NGINX reverse proxy servers.
What Are the Advantages of Using an NGINX Reverse Proxy?
Using an NGINX reverse proxy server can improve performance by balancing traffic across multiple web servers. It also enhances security and scalability within data centers, making it ideal for managing web applications.
Can I Use NGINX as a Reverse Proxy for Multiple Back-End Servers?
Yes, you can use NGINX as a reverse proxy for multiple back ends, even those employing different technologies like Apache Tomcat. This setup enhances resource allocation and boosts other servers’ performance.
What Security Considerations Should I Keep in Mind When Configuring an NGINX Reverse Proxy?
When configuring an NGINX reverse proxy, use SSL to secure data transmission. Given its role as a single point of entry, it’s crucial to enforce robust security measures. Also, ensure proper configuration of WebSockets to maintain secure, real-time communication.
Can I Cache Content With an NGINX Reverse Proxy?
Yes, using NGINX reverse proxy caching can reduce load times and server demand by storing copies of frequently accessed resources. This is particularly handy for microservices and virtual hosts, streamlining content delivery and enhancing user experience.
All of the tutorial content on this website is subject to Hostinger's rigorous editorial standards and values.

Ariffud is a Technical Content Writer with an educational background in Informatics. He has extensive expertise in Linux and VPS, authoring over 200 articles on server management and web development. Follow him on LinkedIn.