How to Secure Your Linux Server with Fail2Ban Configuration

Fail2Ban is arguably the best software to secure a Linux server and protect it against automated attacks. When enabled, it offers many customizable rules to ban source addresses that may try to gain access to your machine. Fail2Ban works hand in hand with a firewall, so we recommend you to install and enable them as separate security layers.
In this article, we will explain what Fail2Ban is and its use cases. We will also show you how to install and set up Fail2Ban.

What Is Fail2Ban and What Is It Used For?
Fail2Ban is a log-parsing application that protects Linux virtual server host against many security threats, such as dictionary, DoS, DDoS, and brute-force attacks. It works by monitoring system logs for any malicious activity and scanning files for any entries matching identified patterns.
If Fail2Ban detects a spike of failed login attempts, it will automatically add new firewall rules to your iptables and block the source address for a specified time or indefinitely.
Installing Fail2Ban helps server owners mitigate any illegitimate activity automatically. It also alerts them via email whenever an attack is occurring.
A similar tool to Fail2Ban is Suricata, an intrusion detection and prevention system (IDS/IPS). Instead of login attempts, this tool monitors your VPS network and notifies users about potentially malicious traffic.
If you want to set up the tool, check out our other tutorial to learn how to install Suricata on Ubuntu.

How to Install Fail2Ban
To install the Fail2Ban service, connect to your server with root access using an SSH client like Terminal (macOS and Linux) or PuTTY (Windows).
Ubuntu:
Here’s how to install Fail2Ban on Ubuntu:
- Before installing a new package, we recommend to update the system repository and software. Run the following command:
apt-get update && apt-get upgrade
- Install the Fail2Ban package by running the command below:
apt-get install fail2ban
- If you want to add email support for the Fail2Ban service, insert the following command and press Enter:
apt-get install sendmail
- Verify Fail2Ban status using the following command:
sudo systemctl status fail2ban
CentOS:
Follow these steps to install Fail2Ban on CentOS:
- Fail2Ban for CentOS7 is included in the Extra Packages for Enterprise Linux (EPEL) repository. Download it by running the command below:
sudo yum install epel-release
- Once that is done, install Fail2Ban by inputting the following command and pressing Enter:
sudo yum install fail2ban
- Enable and start the service by running these commands:
sudo systemctl enable fail2ban
sudo systemctl start fail2ban
Debian:
Here’s how to install Fail2Ban on Debian:
- Update and upgrade your system repository by typing in the command below and pressing Enter:
apt-get update && apt-get upgrade -y
- Proceed with the Fail2Ban installation using the following command:
apt-get install fail2ban
- If you want to add email support, install Sendmail by running this command:
apt-get install sendmail-bin sendmail
- Here’s how to check Fail2Ban’s status:
systemctl status fail2ban
Fedora:
Follow these instructions to install Fail2Ban on Fedora:
- Update your system repository by inserting the command below and pressing Enter:
dnf update
- Install Fail2Ban using this command:
dnf install fail2ban
- If you want to install Sendmail, type in the following command and press Enter:
dnf install sendmail
- Start and enable the Fail2Ban service by running the following commands:
systemctl start fail2ban
systemctl enable fail2ban
- If you’ve added Sendmail, run the following to start and enable it:
systemctl start sendmail
systemctl enable sendmail
How to Set Up Fail2Ban
After installing Fail2Ban, consider configuring it. In this section, we will explore how to do it using the fail2ban.local and jail.local files.
Edit the Default Settings with fail2ban.local (Optional)
The fail2ban.conf file houses Fail2Ban’s basic configuration. It contains the global settings that should not be modified.
If you want to make any changes, we recommend creating a local file. Make a copy of fail2ban.conf and rename it to fail2ban.local to override the default configuration profile.
Here’s how to change the name of the copy and setup the settings on fail2ban.local file:
- Rename the file to fail2ban.local by running the command below. Keep in mind that it will not produce any output:
cp /etc/fail2ban/fail2ban.conf /etc/fail2ban/fail2ban.local
- Type in the following command and press Enter to open the file:
sudo nano /etc/fail2ban/fail2ban.local
- Now you can edit the definitions inside the file.
Let’s go over the options and the values they can take.
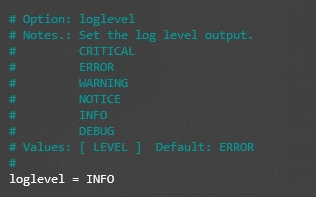
loglevel = INFO
Define the log output level as:
- CRITICAL – emergency conditions that should be investigated immediately.
- ERROR – something goes wrong but is not critical.
- WARNING – a potentially harmful condition.
- NOTICE – a normal but significant condition.
- INFO – informational messages that can be ignored.
- DEBUG – debug-level messages.
logtarget = STDERR
Log actions in a specific target socket, which can be:
- FILE – output to a file socket.
- SYSLOG – output to a message-based log file.
- STDERR – output as a standard error.
- STDOUT – standard output.
syslogsocket = auto
Set the syslog socket file to auto or file (if you’ve set logtarget as SYSLOG).

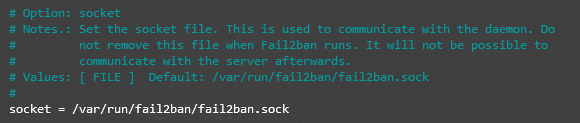
socket = /var/run/fail2ban/fail2ban.sock
Set the socket file to communicate with the daemon. The default location is /var/run/fail2ban/fail2ban.sock.
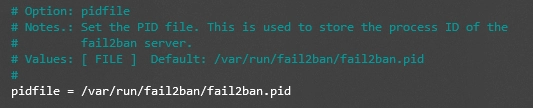
pidfile = /var/run/fail2ban/fail2ban.pid
Set the PID file to store the process ID of the Fail2Ban server. The default location is /var/run/fail2ban/fail2ban.pid.
Setting Up the jail.local Configuration File
Fail2Ban has another configuration file named jail.conf which includes jails – filters with actions. However, users shouldn’t directly modify this file as it contains the basic rule set for the software.
Instead, make a copy of the original file and name it jail.local. Using it, you’ll be able to customize and setup filters and actions, such as ignoreip, bantime, findtime, maxretry, and backend.
ignoreip
This feature requires you to specify trusted IP addresses, DNS hosts, or CIDR masks that Fail2Ban should ignore. This parameter permits all traffic coming from the specified sources. You can add multiple addresses and separate them with a space.

bantime
This parameter sets the length of time that a client will be banned for after failed authentication. The ban period is measured in seconds, and the default number is 600 or 10 minutes.

findtime
This setting determines the time period for failed login attempts. If a host fails authentication a certain number of times (based on the maxretry setting) during the set period, its IP address will be banned.

maxretry
maxretry works together with findtime – it sets the maximum number of unsuccessful login attempts within the defined time window. The default value is 5.

backend
This feature allows you to specify the backend configuration for file modification. The default value is auto, but if you use CentOS or Fedora, it needs to be systemd.
Here are the available values you can choose from:
- pynotify – monitors file system changes in real time and requires a file alteration monitor to be installed.
- gamin – same as pynotify but requires a Gamin tool.
- polling – uses a polling algorithm that doesn’t require external libraries.
- systemd – uses the systemd python library to access the systemd journal.
- auto – will use the previous values in this order – pyinotify, gamin, and polling.

You can also setup additional configurations in the jail.local file, including SSH and iptables settings. The available options include:
- banaction – defines which default action to use when the maxretry threshold is reached. If you use firewalld, set the value to firewallcmd-ipset. However, if you’ve set up UFW as your firewall, change it to ufw.
- banaction_allports – allows you to label and block IP addresses on every port. If you use firewalld, set the value to firewallcmd-ipset.
- port – the value should correspond to the set service. If you use the default port, change the value to the service name. If you use non-traditional port, input its number here.
- filter – the file name located in /etc/fail2ban/filter.d contains the failregex information used to parse log files.
Conclusion
Fail2Ban is log-parsing software that helps protect Linux-based web servers against cyber attacks.
This article has demonstrated howto install Fail2Ban on popular operating systems, such as Ubuntu, CentOS, Debian, and Fedora. We have also explained how to edit fail2ban.local and jail.local, the software’s configuration files.
We hope this article has helped you set up Fail2Ban on your Linux server. If you have any questions or suggestions, leave them in the comments section below.
Learn other VPS security best practices
Complete Iptables Tutorial
How to Setup OpenVPN on Linux
How to Configure UFW Firewall on Ubuntu
How to Install ClamAV on CentOS
Fail2Ban Configuration FAQ
Do I Need Fail2Ban?
Yes, it is an essential part of your server’s security infrastructure. Fail2Ban will help secure your machine from cyber attacks that try to meddle with your login credentials.
Does Fail2Ban Work with UFW?
UFW is an additional security layer to protect your VPS from port-scanning attacks. While Fail2Ban uses iptables as the default firewall system, you can customize the software and enable UFW instead.
Does Fail2Ban Prevent DDoS Attacks?
A DDoS attack is a malicious attempt to interrupt the operation of a targeted server or service by flooding it with fake requests. Using the jail configuration file of Fail2Ban, you can create customized rules to detect excessive requests and block their sources.
Does Fail2Ban Work Out of the Box?
Fail2Ban is active and running as soon as you enable it. Users don’t need to modify its configuration as the software actually provides reasonable protection right off the bat.

Noviantika is a web development enthusiast with customer obsession at heart. Linux commands and web hosting are like music to her ears. When she's not writing, Noviantika likes to snuggle with her cats and brew some coffee.

Comments
October 10 2023
fail2ban does not work "out of the box" with Debian and some other systems - the default configuration is wrong (defaulting to syslog instead of systemd) and there appears to be some internal dispute about who is responsible for fixing it that has been preventing it from being resolved for a year now, I think. In any case, the solution is: edit the file /etc/fail2ban/jail.d/defaults-debian.conf to look like this: [sshd] enabled = true backend = systemd Then copy that file to /etc/fail2ban/jail.local Restart fail2ban and Bob's your uncle.
October 31 2023
Hello there! Thank you so much for sharing your solution. We're always looking for ways to improve our content, and your feedback will help us do just that ?