How to Install WordPress on Ubuntu Automatically and With the LAMP Stack
WordPress hosting service lets you quickly set up the content management system (CMS) to create a website. While such a solution is easy to use, the web host usually limits you from choosing the web server and database.
If you’re looking for extensive customization, you should set up WordPress on a virtual private server (VPS) instead. This hosting type lets users choose any software to set up the CMS and tailor the server settings to their needs.
To help you get started, this tutorial will explain how to install WordPress on Ubuntu. We will provide two methods: automatically using the Hostinger VPS template and manually with commands.

Prerequisites for Installing WordPress on Ubuntu
Before setting up WordPress, ensure your VPS is running Ubuntu since the commands differ for another Linux operating system.
To avoid incompatibility issues, check your Ubuntu version and ensure you are running 22.04 or later. Your VPS should also support software required for WordPress, like a web server and database.
In addition, your VPS must provide an SSH connection, which allows remote command execution for manually setting up WordPress.
We recommend Hostinger VPS since it supports Ubuntu and other software necessary for WordPress installation. Moreover, our operating system templates let you configure the CMS in one click. We will explain how to do so in the following section.
Also, ensure you have pointed a domain name to your VPS since we will use it to access the WordPress admin panel and finish the setup process.

Installing WordPress on Ubuntu Automatically
Hostinger VPS users can easily install WordPress via their web browser using the pre-configured OS template. This method is suitable for beginners since it doesn’t use commands, making the process safer and simpler.
Clearing the cookies will log you out of previously-visited websites. Thus, we recommend saving your login information before following this method.
Here’s how to do so:
- Log in to hPanel and click VPS on the top menu.
- Click Manage on the VPS you want to install WordPress.
- Navigate to the side panel → Settings → OS & Control Panel → Operating System.
- In the operating system configuration menu, select Applications and choose Ubuntu 22.04 with WordPress.
- Click Change OS to confirm.
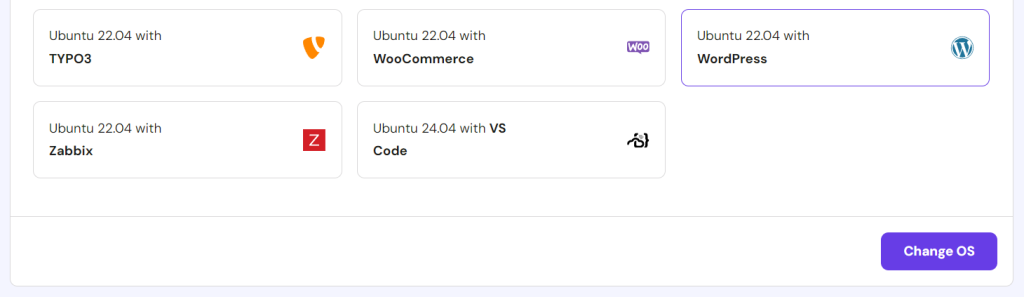
- Check the confirmation box to acknowledge that the installation will wipe your data. Click Next.
- Enter a new Panel password and click Confirm.
Wait until the installation process is finished, which should take a few minutes. That’s it! You can now access the WordPress admin area by visiting this address. Remember to replace the VPS hostname with the actual value:
http://your-vps-hostname/wp-admin
If the address doesn’t work, change the VPS hostname to your domain name by going to the Settings menu in hPanel. Then, enter the following URL instead:
http://domain.tld/wp-admin
Note that you can’t choose the web server and database solution if you configure WordPress using Hostinger’s OS template.
Installing WordPress on Ubuntu using a LAMP stack
If you need particular software for your WordPress website, install it manually using commands. For example, if you want to use Apache and MySQL, set up the LAMP stack on your Ubuntu server.
Pro Tip
Hostinger VPS also offers a template that automates Ubuntu and LAMP stack setup, which you can install from the same menu as the WordPress one.
1. Set Up the Apache Web Server
A web server like Apache receives and processes client requests for your website. Before installing it, connect to your VPS using the PuTTY SSH client and create a new user.
In SSH, you will connect as root by default. However, using this account to manage your VPS can be unsafe since it can run any command without confirmation, including those that can alter important system settings.
Using a new user helps minimize the risk since it requires the sudo prefix and password to execute commands. To create one, run the following and replace username with your desired value:
adduser username
Add the user into the sudoers group to grant the superuser privilege:
usermod -a -G sudo username
Switch from root to the new user using this command:
su username
You should see the beginning of your command line changes to the new username. Enter cd to change the directory since you are currently using the root account’s path.
Let’s begin the installation by updating your system repository to ensure you have the latest package version. Here’s the command:
sudo apt update
Now, install Apache using the following command:
sudo apt install apache2
Configure Apache to make it start automatically after a system reboot:
sudo systemctl enable apache2
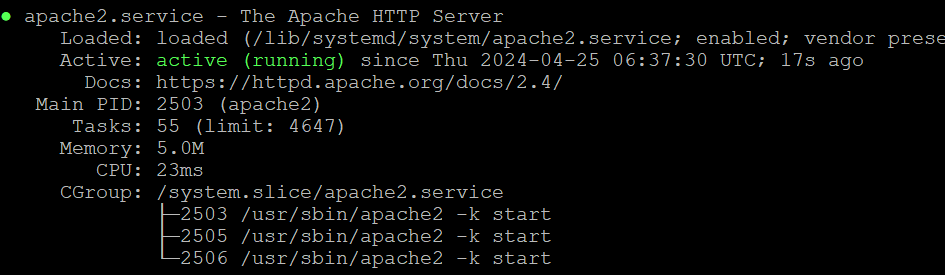
To ensure the Apache web server is properly installed and enabled, check the service status by entering the following:
sudo systemctl status apache2
2. Install PHP
Since WordPress is written in PHP, install the scripting language to enable your server to interpret it. It also connects the front end with the back end, allowing your website to communicate with the database.
In addition to the PHP programming language, we will install other extensions which are WordPress dependencies. Here is the command:
sudo apt install php libapache2-mod-php php-mysql php-curl php-gd php-xml php-mbstring php-xmlrpc php-zip php-soap php-intl -y
Now, let’s check whether PHP is installed correctly by creating a test file. To do so, navigate to Apache’s root directory using this command:
cd /var/www/html
Then, create a new PHP test file using the nano text editor. You can use any name, but we will use validate.php:
sudo nano validate.php
In the text editor window, paste the following testing script:
<?php

phpinfo();

?>
Press Ctrl + X, Y, and Enter to save the changes. Now, visit the following address in your web browser to access the file. You can use either your server IP address or domain name:
domain.tld/validate.php
If PHP is configured correctly, you should see a table containing the scripting language’s information, like the following.
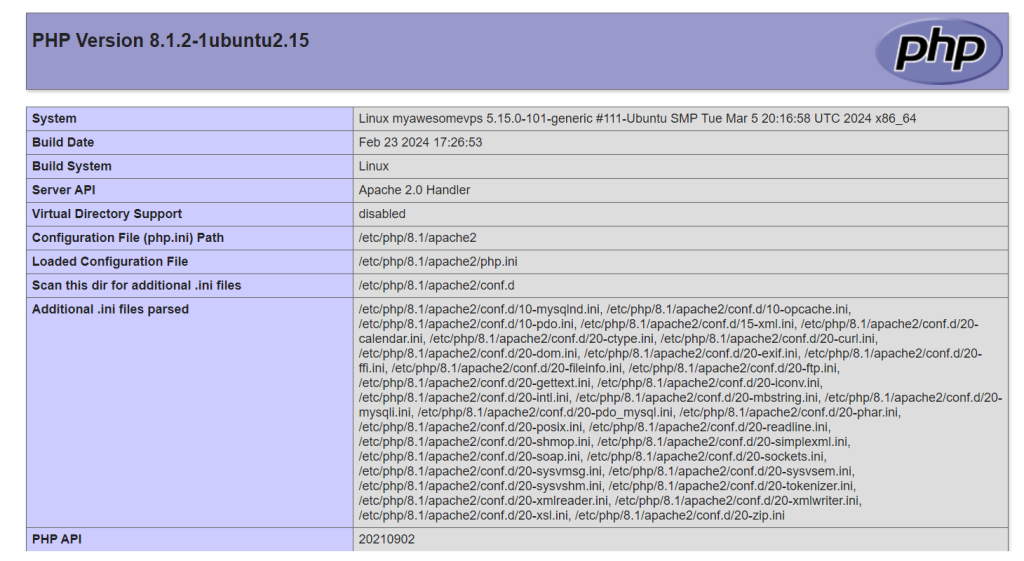
Return to your command-line interface and immediately delete the PHP file since cybercriminals might exploit it to gain access to your server. Here’s the command:
sudo rm validate.php
3. Configure MySQL and phpMyAdmin
The last component of WordPress is the database, which allows your website to store and fetch user data. Since we are using the LAMP stack, we will install MySQL. To do so, return to the main directory by entering cd and run the following:
sudo apt install mysql-server
MySQL will create a default root user that you can use to manage the database. However, we must enable its password authentication manually. Start by entering the MySQL shell using the following:
sudo mysql
Run the following command to set a new root database user password. Remember to replace your-password with the actual value:
ALTER USER 'root'@'localhost' IDENTIFIED WITH mysql_native_password BY 'your-password';
Then, enter the following to refresh the database configuration:
FLUSH PRIVILEGES;
Next, let’s create a new database for WordPress using the following command. In this tutorial, we will name it WordPressDB:
CREATE DATABASE WordPressDB DEFAULT CHARACTER SET utf8 COLLATE utf8_unicode_ci;
Now, make a new user to manage the WordPress database using this command. Replace username and user-password with the actual value:
GRANT ALL ON WordPressDB.* TO 'username'@'localhost' IDENTIFIED BY 'user-password’;
Rerun the flush privileges command to apply the changes and enter exit to quit the shell. Now, execute the following to configure your MySQL database server security settings:
sudo mysql_secure_installation
Adjust each setting based on your preferences. To learn more about the parameters and the recommended settings, check out our guide about securing MySQL on LAMP.
In addition to MySQL, we will also install phpMyAdmin, a database administration panel that offers a graphical user interface to simplify management tasks. To do so, run:
sudo apt install phpmyadmin php-json
Hit Space to check Apache as your web server and confirm using Enter. Then, set the phpMyAdmin panel password. After completing the configuration, enable the PHP Mbstring extension using this command:
sudo phpenmod mbstring
Restart Apache to apply the changes using this command:
sudo systemctl restart apache2
Now, log in to MySQL root account by entering the following:
sudo mysql -u root -p
Enter the root password to access the MySQL shell. Then, run the following command to grant phpMyAdmin privilege to enable database connection:
GRANT ALL PRIVILEGES ON *.* TO 'phpmyadmin'@'localhost';
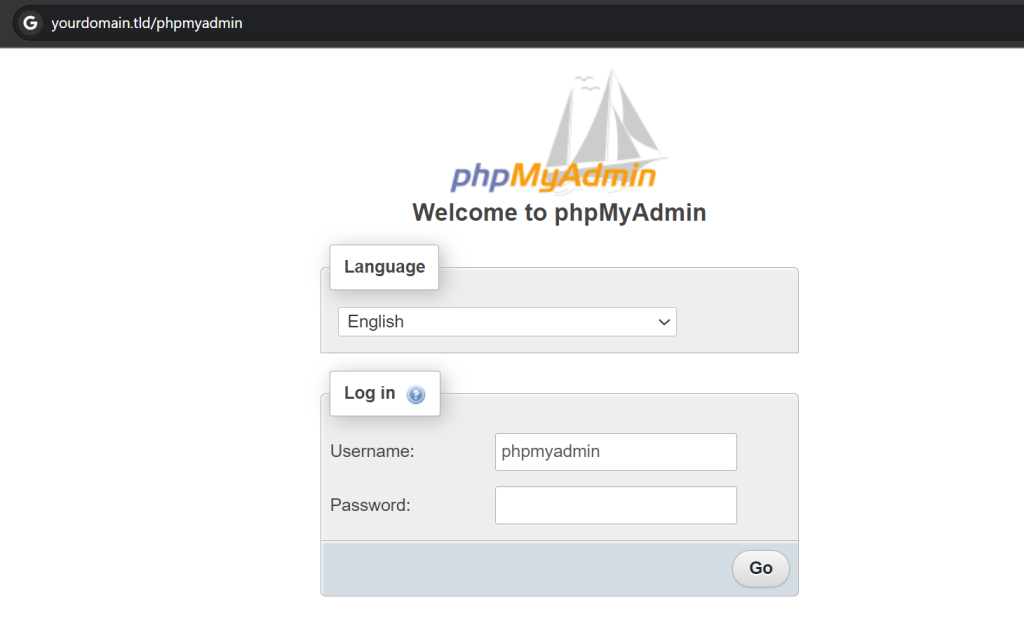
Flush the privileges to refresh the configuration and enter exit to close the MySQL shell. To check whether phpMyAdmin is configured correctly, enter the following address in your web browser:
http://domain.tld/phpmyadmin
Remember to replace the domain with the actual value. On the login page, enter phpMyAdmin as the username and use the password you set during the panel installation.
Important! If you encounter the “URL not found” error, run sudo dpkg-reconfigure phpmyadmin to rerun the installation and tick Apache by pressing space. Meanwhile, ensure you assign the correct user to the MySQL database if facing login issues.
4. Install WordPress
After configuring all dependencies, we can set up WordPress. Before doing so, we will create a configuration that will let plugins use .htaccess files to add new functionalities to your site:
sudo nano /etc/apache2/sites-available/WordPress.conf
Pay attention to the capitalization since Linux commands are case-sensitive. Add the following code to the configuration file:
<Directory /var/www/wordpress/>

   AllowOverride All

</Directory>
Press Ctrl + X, Y, and Enter to save the changes. Now, download WordPress with wget to start the installation:
sudo wget https://wordpress.org/latest.tar.gz
Once downloaded, run the following command to unpack the WordPress files:
sudo tar -xvf latest.tar.gz
The command will extract the tar archive’s content into a wordpress folder on your current working path. To make the CMS accessible online, move it to Apache’s root directory using this command:
sudo mv wordpress /var/www/html/
Change the permissions and ownership of the wordpress installation directory to allow the webserver to access its content. Do so by running these commands subsequently:
sudo chown -R www-data:www-data /var/www/html/wordpress/
sudo chmod -R 755 /var/www/html/wordpress/
We are done with the commands. Now, the last step is to complete the WordPress setup wizard from your web browser. Visit the following address with domain.tld being your actual domain name:
http://domain.tld/wordpress
Click Let’s Go, and WordPress will ask you to enter information about your database. Enter the credentials you have created in the previous steps, but leave out the host and prefix fields. Click Submit once finished.
In the next screen, hit Run the installation. Enter information about your WordPress username, password, site title, and admin email address. Ensure you uncheck the “Discourage search engines from indexing this site” to make your website discoverable on the search engine result pages.
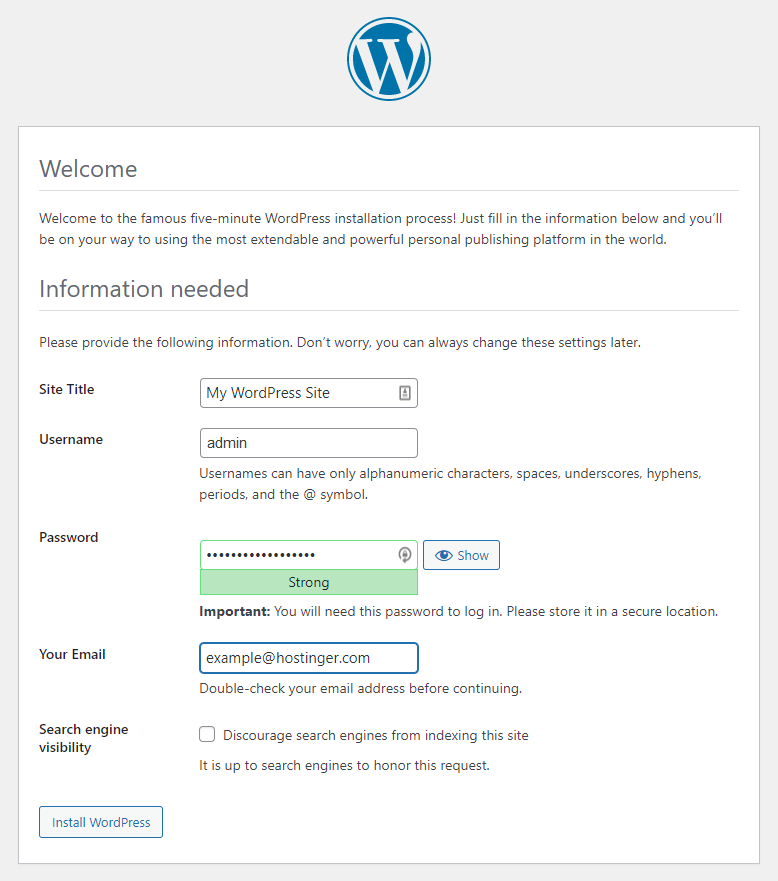
Click Install WordPress to proceed with the setup. Once finished, click Log in on the confirmation screen and enter your account credentials to access the WordPress dashboard. That’s it! You can now start creating your website using the CMS.
Conclusion
Hosting WordPress on a VPS provides more flexibility over dedicated CMS hosting since you can choose different web servers and database solutions. However, installing it can be difficult due to the need for commands.
Hostinger VPS users can easily install WordPress on an Ubuntu server without commands by selecting the Ubuntu 22.04 with WordPress template in hPanel’s operating system menu. Then, visit the VPS hostname followed by /wp-admin to access the dashboard.
Another method is to configure WordPress with LAMP stack using commands. After connecting to your server via SSH, install the Apache server and PHP extensions. Then, set up the MySQL database and phpMyAdmin management panel.
Once the stack is set, download the WordPress installation and unpack it using the tar command. Move it to the Apache root directory and visit your domain name followed by /wordpress to initiate the setup wizard.
How to Install WordPress on Ubuntu FAQ
This section will answer several questions about installing WordPress on Ubuntu 22.04 and later.
Can I Install WordPress on Ubuntu Without Using the Command Line?
Yes! Hostinger users can install WordPress on Ubuntu without commands using our operating system template. To do so, log in to hPanel and manage the VPS in question. Navigate to the operating system configuration menu and select Ubuntu 22.04 with WordPress.
How Do I Secure My WordPress Site on Ubuntu?
Apply robust safety measures on your VPS, including enabling a firewall, installing SSL, and setting up Fail2Ban. To secure WordPress, install plugins like Wordfence, avoid untrusted extensions, regularly update the core files, and set up a blocklist.
How Can I Access My WordPress Site After Installation?
To access your WordPress site after installation, simply visit your VPS domain in a web browser. If you haven’t completed the setup wizard, add /wordpress at the end of the URL. Meanwhile, insert /wp-admin if you want to open the WordPress dashboard page.

Aris is a Content Writer specializing in Linux and WordPress development. He has a passion for networking, front-end web development, and server administration. By combining his IT and writing experience, Aris creates content that helps people easily understand complex technical topics to start their online journey. Follow him on LinkedIn.

Comments
March 31 2020
There is a catch with your configuration: if you want to replace the default site by your WordPress site, ServerName must be given in VirtualHost and you must activate the site with a2ensite WordPress command.
July 21 2020
Thank you, You don't have a french version of this tutorial ? Thank's Bina
July 22 2020
Hey there Bina! Due to accessibility to as many of our users as possible, all of our tutorials are in English as of now.
August 03 2020
I followed the instructions carefully thereafter I attempt the interface installation of WordPress by using the localhost but it kept loading the apache2 default file.
November 11 2020
Hey David! :) Hope you are having a great day. I can't check what exactly you've done, especially via the comment threads, but feel free to message our support team, and they will guide you through :)
August 03 2020
Thanks. It worked! I made some mistake with my Database record.
August 17 2021
How to install WP on the URL?
September 20 2021
Hi, if you're looking to install WP on a different URL, just make sure to use that custom path instead of
/var/www/wordpress/. Good luck!August 24 2021
Hi everyone, Need help here. I'm stuck at "Prepare to Install WordPress on Ubuntu". I cannot create a configuration file "WordPress.conf" in "/etc/apache2/sites-available/". I tried create file "WordPress.conf" and moved to "/etc/apache2/sites-available/", still not working. Error Permission denied. Hopefully someone can assist me to solve my issues.
September 20 2021
Hi there! The easiest way to work around it would be using
sudo chmod 777 /var/www/html -Rto reset permissions. Just don't forget to set proper permissions (750 and 640) afterwards to keep your website safe :)January 15 2022
[ Error Writing sample.php: Permission denied ] I have been hunting but so far no luck.
January 18 2022
Hey Ed, it looks like you might not have the rights to edit this file. I would suggest to double-check that you're connected to a root user and retry with command
sudo nano sample.php. Additionally, you might want to reset file permissions for sample.phpAugust 05 2022
Hello! I just ran the command "nano /etc/apache2/sites-available/WordPress.conf" and tried to enable .htaccess by adding these lines to the VirtualHost block: AllowOverride All </Directory I clicked ctrl + X, it asks me "Save modified buffer?". I press Y and this error message appears: [ Error writing /etc/apache2/sites-available/WordPress.conf: Permission denied ] I would really appreciate some help. Thank you
August 12 2022
Hey there! We would suggest using sudo command, for example sudo nano, when you want to change something in /etc directory, because it is system directory. In Ubuntu, this is the default security measure ?