How to update PHP in WordPress safely
Sep 03, 2026
/
By Yoga K.
/
6 min Read
To update PHP in WordPress safely, first check that your WordPress version, theme, and plugins support the target PHP version, back up your site, and test the change on staging when possible. Then, update WordPress core, plugins, and themes before switching the PHP version in hPanel.
After the update, test your site for compatibility issues and be ready to revert to the previous PHP version if something breaks. In this guide, we’ll walk through the complete WordPress PHP update process, including compatibility checks, backups, staging, WP-CLI preparation, hPanel configuration, and post-update testing.
Download WordPress security checklist
Why update PHP in WordPress?
Updating PHP in WordPress helps keep your site compatible with current WordPress releases, plugins, and themes. As WordPress software evolves, developers may stop supporting older PHP versions or require a newer version for updates and new features.
Using a supported PHP version also reduces the risk of compatibility and security issues caused by outdated software. However, updating PHP can expose problems in older plugins, themes, or custom code, so check compatibility before making the change.
For this reason, a WordPress PHP update should be treated as a site-wide compatibility task rather than just a server setting change.
Pro Tip
As WordPress is based on PHP, you can insert custom PHP code to enhance your website's functionality.
PHP version compatibility for WordPress
While WordPress supports multiple PHP versions, we highly recommend using the latest version of PHP to ensure your website remains secure and up-to-date. However, note that not all WordPress versions are compatible with newer PHP releases.
Use the following chart to check whether your WordPress site supports the latest PHP version:
| WordPress Version | Supported PHP Versions |
| 5.0, 5.1 | PHP 5.2, PHP 5.3, PHP 5.4, PHP 5.5, PHP 5.6, PHP 7.0, PHP 7.1, PHP 7.2, PHP 7.3 |
| 5.2 | PHP 5.6, PHP 7.0, PHP 7.1, PHP 7.2, PHP 7.3 |
| 5.3, 5.4, 5.5 | PHP 5.6, PHP 7.0, PHP 7.1, PHP 7.2, PHP 7.3, PHP 7.4 |
| 5.6, 5.7, 5.8 | PHP 5.6, PHP 7.0, PHP 7.1, PHP 7.2, PHP 7.3, PHP 7.4, PHP 8.0* |
| 5.9, 6.0 | PHP 5.6, PHP 7.0, PHP 7.1, PHP 7.2, PHP 7.3, PHP 7.4, PHP 8.0*, PHP 8.1* |
| 6.1, 6.2 | PHP 5.6, PHP 7.0, PHP 7.1, PHP 7.2, PHP 7.3, PHP 7.4, PHP 8.0*, PHP 8.1*, PHP 8.2* |
| 6.3 | PHP 7.0, PHP 7.1, PHP 7.2, PHP 7.3, PHP 7.4, PHP 8.0*, PHP 8.1*, PHP 8.2* |
| 6.4 | PHP 7.0, PHP 7.1, PHP 7.2, PHP 7.3, PHP 7.4, PHP 8.0*, PHP 8.1*, PHP 8.2*, PHP 8.3* |
Note that the (*) symbol indicates the version of PHP is in the beta support phase or compatible but with exceptions, meaning you may encounter minor issues. Also, some themes and plugins may not support these PHP versions yet.
How to update PHP in WordPress
Updating the PHP version in WordPress only takes several steps. However, you must be careful, as updating to an unsupported PHP version can break your WordPress website.
In this section, we will show you the safest ways to update PHP.
1. Check WordPress, theme, and plugin compatibility
Before updating PHP, confirm that your WordPress installation supports the PHP version you plan to use. WordPress core may support a PHP version even when some plugins, themes, or custom code do not.
Start by checking your current WordPress and PHP versions in Tools → Site Health → Info in the WordPress dashboard. Then, verify that your WordPress version supports the target PHP version.
Next, review your active plugins and theme for compatibility. Check their requirements and update history, especially if they have not been updated recently. Older plugins, themes, and custom PHP code are more likely to cause errors after a PHP upgrade.
If any essential component does not support the target PHP version, update or replace it before proceeding. This reduces the risk of errors, broken functionality, or an inaccessible WordPress dashboard after the PHP change.
2. Create a backup of your WordPress site
Back up your WordPress site before changing the PHP version so you can restore it if the update causes compatibility issues.
Make sure the backup includes both your website files and database. Hostinger users can back up their WordPress site directly from hPanel:
- On hPanel, go to Files → Backups.
- Choose the Generate new backup option → Select.
- A pop-up window will appear, asking for confirmation. Click Proceed to start the backup.
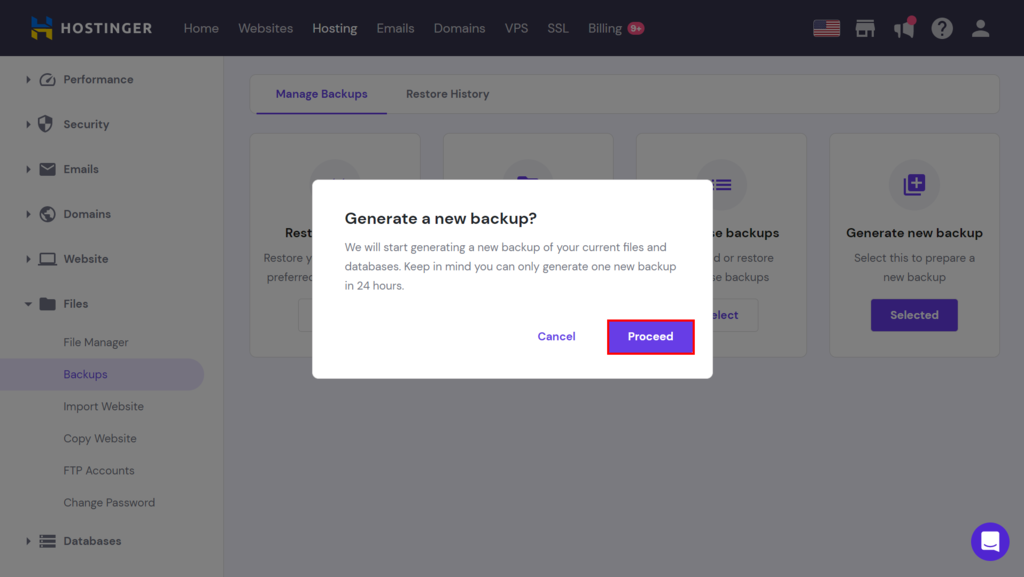
- Wait until the backup process is complete. It may take a while if your website has large amounts of data.
Another option is to create a backup by using a plugin like UpdraftPlus WordPress Backup Plugin. Here is how:
- Install and activate the UpdraftPlus plugin.
- Go to Settings → UpdraftPlus Backups.
- Click the Backup Now button.
- Select the database and website files options on the pop-up window. Then, click the Backup Now button to confirm the action.
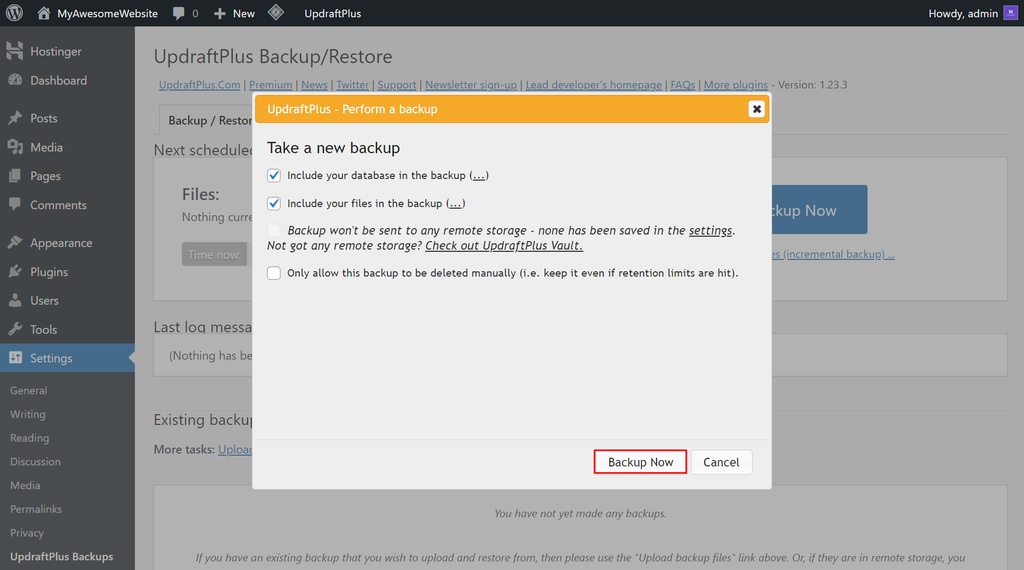
- The backup process might take a while, depending on the size of your WordPress website files and database.
Keep the backup available until you have confirmed that the site works correctly with the new PHP version. If the update causes errors that you cannot resolve quickly, revert to the previous PHP version and restore the backup if necessary.
3. Test the PHP update on a staging site
Test the target PHP version on a staging copy of your WordPress site before applying it to the live website. A WordPress staging environment lets you identify compatibility issues without affecting visitors.
Create a staging copy that matches your live site, including its WordPress version, active theme, plugins, and custom code. If the staging site runs on a subdomain, you can change the PHP version for that specific subdomain to test the target version without changing the live site’s PHP configuration.
After switching PHP on staging, check the frontend and WordPress dashboard, test important forms and interactive features, and look for plugin or theme errors. If everything works as expected, proceed with preparing the live WordPress site for the PHP update.
If you encounter errors, resolve them on staging before changing PHP on the live site.
4. Update the WordPress core, themes, and plugins
Update WordPress core, plugins, and themes before changing PHP, so your site uses versions more likely to support the target PHP release.
From the WordPress dashboard, go to Dashboard → Updates and install any available WordPress, plugin, and theme updates. If you manage WordPress from the command line, you can also use WP-CLI to update these components.
After updating, check that the site still works correctly on its current PHP version. Pay particular attention to important plugins, your active theme, forms, checkout functionality, and any custom code.
If an essential plugin or theme cannot be updated or does not support the target PHP version, resolve that compatibility issue before proceeding with the PHP change.
Optional: Prepare WordPress for the PHP update with WP-CLI
You can also use WP-CLI to check your WordPress environment and update WordPress components before changing PHP in hPanel.
First, connect to your site through SSH and navigate to the WordPress installation directory. Then, check the PHP environment used by WP-CLI:
wp --info
Look for the PHP version entry in the output. Keep in mind that WP-CLI uses the command-line PHP environment, which may differ from the PHP version serving your website.
Next, update WordPress core, plugins, and themes:
wp core update
wp plugin update --all
wp theme update --all
Check your site after completing the updates to make sure everything still works correctly.
WP-CLI prepares the WordPress installation for the PHP upgrade, but it does not change the PHP version used by your website. For Hostinger sites, make that change through hPanel as described in the next step.
5. Update the PHP version of your WordPress site
Change the PHP version of your WordPress site in hPanel after confirming that WordPress core, your theme, and plugins support the target version.
Hostinger users can change the PHP version from the PHP Configuration settings:
- On hPanel, navigate to Advanced → PHP Configuration.
- Select the preferred PHP version and click Update.
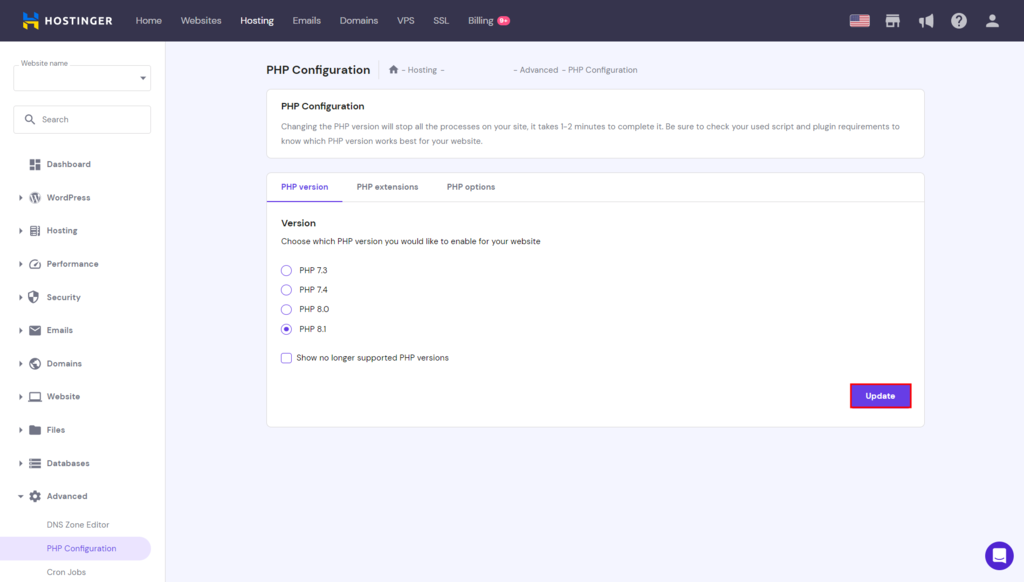
- Click Confirm.
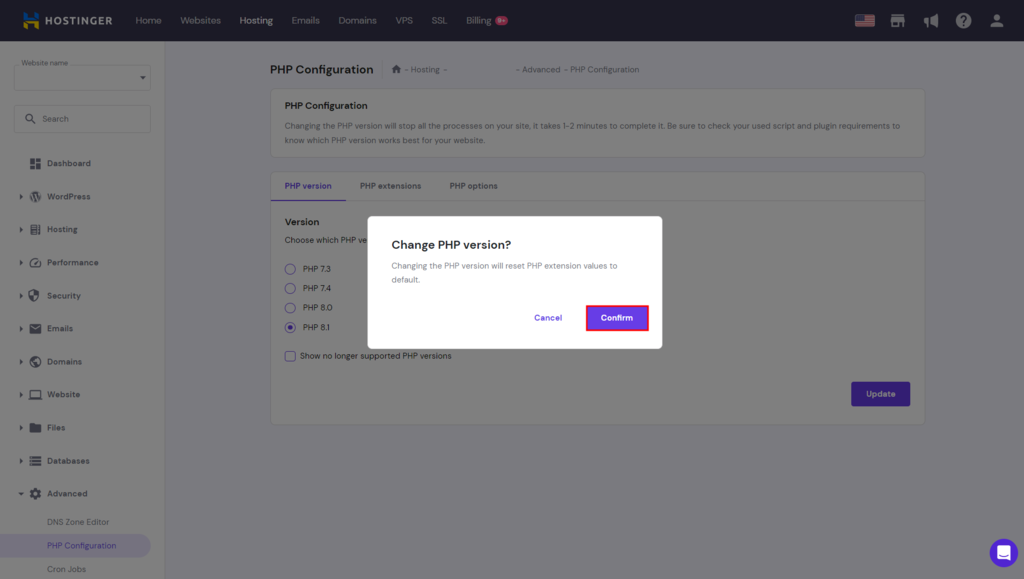
- Wait until the update process is complete.
The new PHP version will apply to your live WordPress site. Don’t consider the update complete yet – test the site immediately afterward to make sure its frontend, WordPress dashboard, plugins, and other important functionality still work correctly.
6. Test your WordPress site after updating PHP
Test your WordPress site immediately after changing PHP to confirm that the new version does not cause compatibility or functionality issues.
Check both the frontend and WordPress dashboard. Review the pages and features that matter most to your site, including:
- navigation and page layouts
- forms and login functionality
- plugins and widgets
- ecommerce checkout and payment flows, if applicable
- custom features or PHP-based integrations
Also go to Tools → Site Health in the WordPress dashboard and check for critical issues or recommendations related to PHP, plugins, themes, or server configuration.
If you notice errors, broken layouts, missing features, or an inaccessible dashboard, revert to the previous PHP version first. Then troubleshoot the affected plugin, theme, or custom code before trying the upgrade again.
What to do if WordPress breaks after updating PHP
If your WordPress site breaks after updating PHP, switch back to the previous PHP version first to restore the site while you investigate the compatibility issue.
Once the site is working again, identify what caused the problem:
- Check whether WordPress reports errors in Tools → Site Health.
- Check the PHP error log for errors related to a plugin, theme, or custom code.
- Disable incompatible plugins one at a time to isolate the issue.
- Temporarily switch to a default WordPress theme if the problem appears theme-related.
- Check custom PHP code for functions or syntax that the newer PHP version no longer supports.
Make and test any fixes on a staging site before trying the PHP update again. If you cannot resolve the compatibility issue immediately, keep using the previous supported PHP version until the affected component is updated or replaced.
Hostinger users can also contact Customer Success through hPanel if they need help identifying a PHP configuration or compatibility issue.
Next steps after updating PHP in WordPress
After updating PHP in WordPress, keep WordPress core, plugins, and themes up to date so they remain compatible with supported PHP versions.
From here, you can:
- Review WordPress maintenance tasks to keep your site secure and reliable.
- Monitor Tools → Site Health for new compatibility or configuration issues.
- Test future PHP upgrades on a staging site before applying them to your live website.
Keeping PHP and WordPress components current helps reduce compatibility problems and makes future upgrades easier to manage.
All of the tutorial content on this website is subject to Hostinger's rigorous editorial standards and values.

Information Technology and web development are Yoga's passions. He loves nothing more than sharing his experience with readers, and helping them to understand the world of IT. In his spare time, Yoga likes to make music and learn to code. He is always looking for new challenges, and enjoys pushing himself to learn new things.