How to Install LAMP on Ubuntu 23.04 in 3 Steps

This tutorial will teach how to install LAMP on Ubuntu 23.04 VPS. LAMP is an acronym for Linux, Apache, MySQL, and PHP – a popular stack for creating and deploying dynamic web applications.
In this web stack, Linux serves as the web application’s operating system. Apache acts as the web server that processes and retrieves content from the MySQL database. Meanwhile, PHP enables your system to process dynamic content.
Other LAMP stack variants may use Perl or Python as the interpreter instead of PHP. However, we are going to install PHP in this tutorial as it is the most popular choice for this stack.

Prerequisites for Installing LAMP
Before you read this Ubuntu LAMP tutorial further, ensure that all the required tools are prepared for a smooth installation process.
You will need a virtual private server (VPS) running the latest version of Ubuntu. In this tutorial, we will use Ubuntu 23.04 since it is the newest release at the time of writing.
Ensure your server supports connection via secure shell (SSH) for remote installation. Also, your local machine must have a Terminal or software like PuTTY installed to run SSH commands on your VPS.
We recommend Hostinger VPS hosting as it is compatible with the newest Ubuntu version and various software, including the LAMP web stack. It also supports full root access via SSH to help avoid permission issues during installation.
Users can also access Hostinger VPS remotely from their web browser via the Browser terminal. Moreover, they can use an operating system template to easily install various software, including a web stack, in one click via hPanel.

How to Install LAMP on Ubuntu at Hostinger
At Hostinger, you can easily install LAMP using an operating system template via hPanel. This method is suitable for newcomers since it doesn’t require any command, making the process easier and safer.
Important! Back up your VPS files before installing an operating system template since this process will delete your data permanently.
Here are the steps to install LAMP on Ubuntu at Hostinger:
- Log in to hPanel and click VPS on the top menu.
- Select the VPS hosting plan on which you want to install LAMP.
- From the sidebar, click Settings → OS & Panel → Operating system.
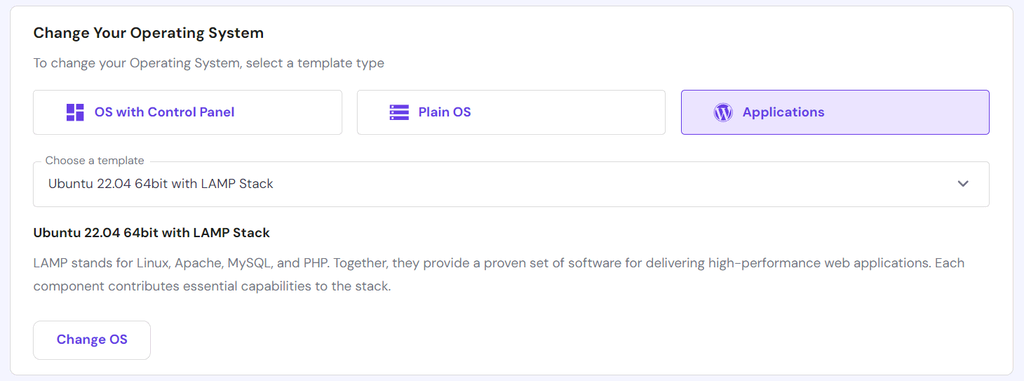
- In the Change Your Operating System section, click Applications.
- Select Ubuntu 22.04 with LAMP stack from the drop-down menu. Click Change OS to confirm.
- You will see a confirmation window about data deletion. Check the box to acknowledge the warning and click Confirm.
- Enter a new root password and click Confirm to proceed.
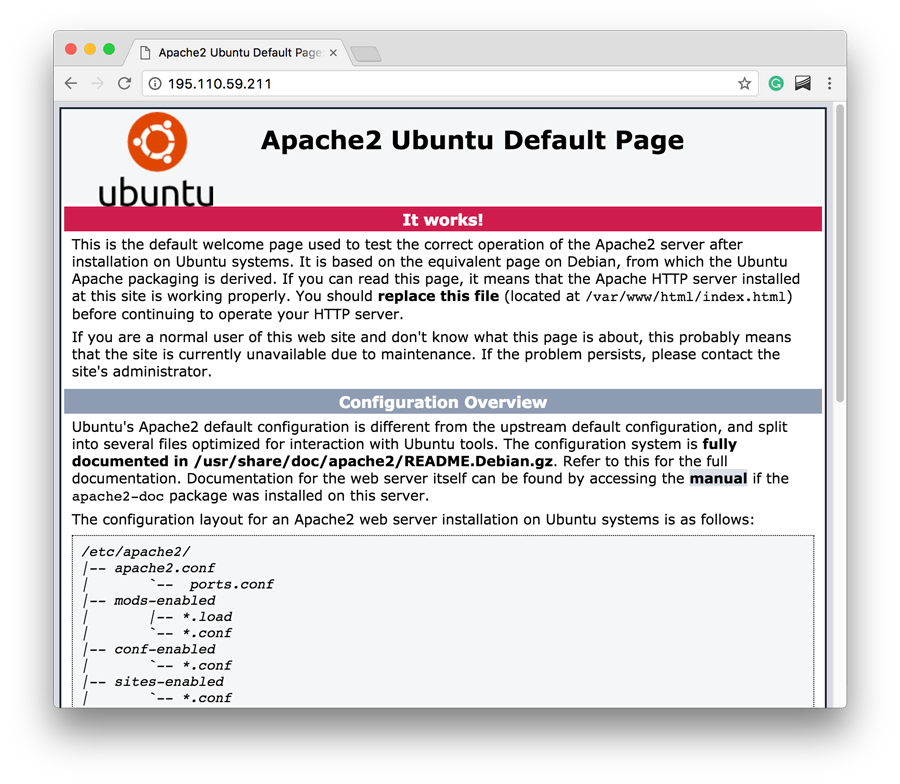
Once the installation process is finished, you should see a confirmation message on the top of the operating system installation page. If you enter your server’s IP address into a web browser, you should see the Apache welcome page.
Note that you can only install a specific version of software based on the template. If you want to use a newer version, like Ubuntu 23.04, update it later via Terminal.
How to Install LAMP on Ubuntu Manually
If you prefer a particular version of each software in your stack, consider installing LAMP manually using commands. Before proceeding, connect to your server using the PuTTY SSH client and enter the login credentials found in the VPS overview menu’s SSH access tab.
1. Install Apache Web Server
Start the installation by updating your system’s package manager to ensure you have the latest software versions. Here are the commands:
sudo apt update
sudo apt upgrade
Now install Apache2 with the following command
sudo apt-get install apache2
Check whether Apache is successfully installed by opening your browser on your local machine and entering the following address in the address bar.
http://<your_vps_ip_address_here>
For example, if your VPS IP address is 185.185.185.185, your address should be:
http://185.185.185.185
You should see a page that looks like this:
If you don’t know your VPS IP address, check it via the SSH access tab on hPanel’s VPS overview menu. Alternatively, run the following command to print the information on your Terminal:
dig -4 TXT +short o-o.myaddr.l.google.com @ns1.google.com
If the screen above doesn’t show up, check the Apache server status by running the following to ensure it is enabled and running:
sudo systemctl status apache2
Also, the welcome screen might not display if your firewall blocks Apache from serving web requests on port 80 and port 443. To resolve it, install Ubuntu’s Uncomplicated Firewall to manage your server’s connection rules. Here’s the command:
sudo apt-get install ufw
Then, allow HTTP and HTTPS traffic through the firewall.
sudo ufw allow http

sudo ufw allow https
Enter your VPS IP address in your browser to check the installation.
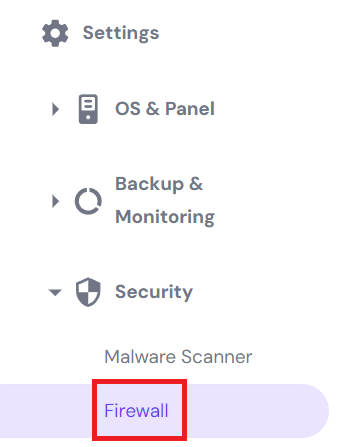
Instead of UFW, you can manage Hostinger VPS firewall configuration via hPanel. To do so, open the VPS overview menu and navigate to Security → Firewall section from the sidebar:
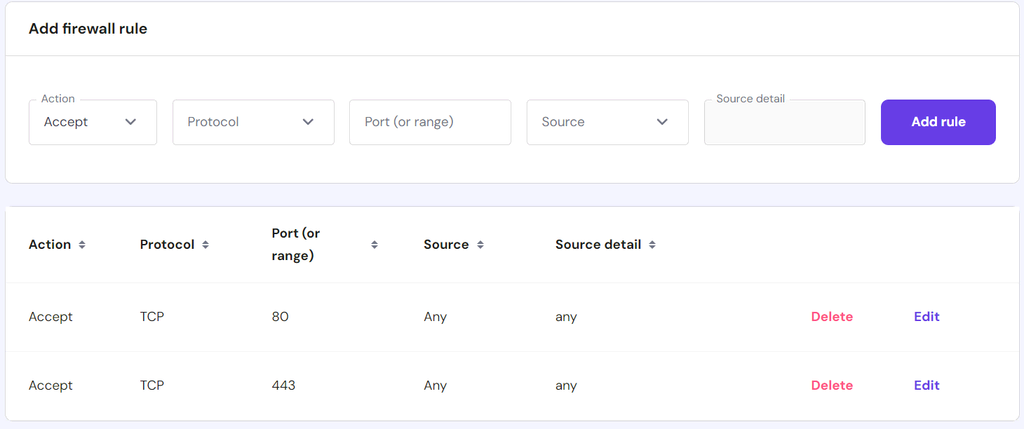
On the configuration screen, create a new firewall setting, give it a name, set your preferred rules, and click Activate. To enable Apache, set it to accept TCP from port 80 and 443.
2. Install MySQL
MySQL is the database for your application. To install it, enter the following command.
sudo apt-get install mysql-server
During installation, Terminal will prompt you for the MySQL root user. Since this account has the highest privilege over your database, use a secure credential with a combination of numbers and symbols. Hit Enter to confirm.
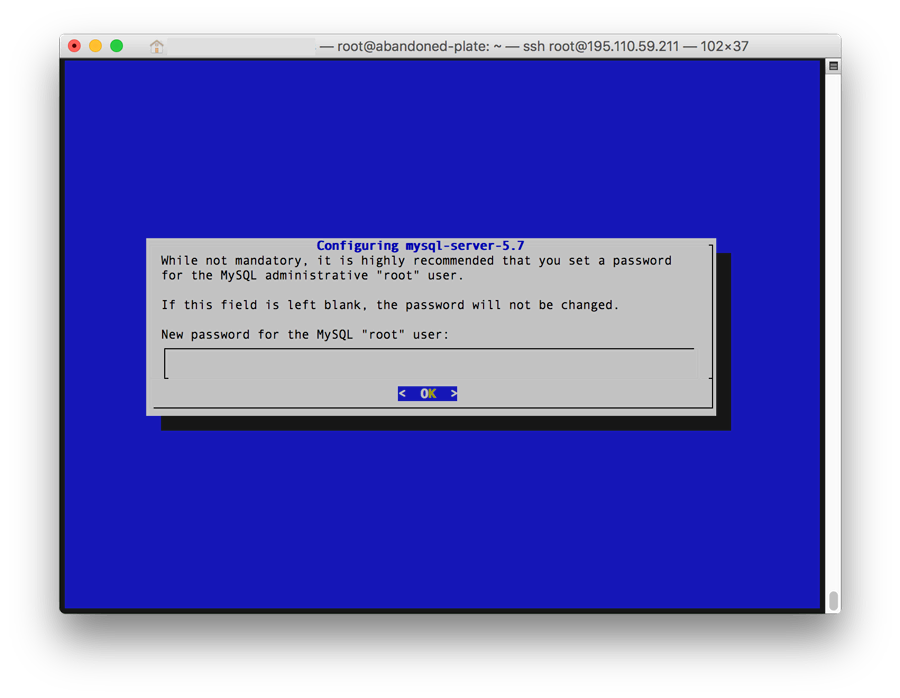
You will use the root user to create other accounts in the databases. Separating roles in MySQL is a recommended practice when developing a new web application to improve security and organization.
Once installed, check the MySQL service status with the following command.
sudo systemctl status mysql
You should see the status as loaded, running, and active, similar to the following:
● mysql.service - MySQL Community Server

   Loaded: loaded (/lib/systemd/system/mysql.service; enabled; vendor preset: enabled)

   Active: active (running) since Tue 2017-07-11 09:39:40 EDT; 1min 39s ago

 Main PID: 9579 (mysqld)

   CGroup: /system.slice/mysql.service

           └─9579 /usr/sbin/mysqld

Jul 11 09:39:39 abandoned-plate systemd[1]: Starting MySQL Community Server...

Jul 11 09:39:40 abandoned-plate systemd[1]: Started MySQL Community Server.
Pro Tip
Check out our tutorial to learn other methods to check and list installed packages on Ubuntu.
3. Install PHP
PHP interprets your application’s code, allowing it to display in the web browser. Install the programming language and other essential modules with the following command
sudo apt-get install php libapache2-mod-php php-mcrypt php-mysql php-cgi php-curl php-json
This command will install the latest stable version of PHP and additional modules required for the web application’s functionality.
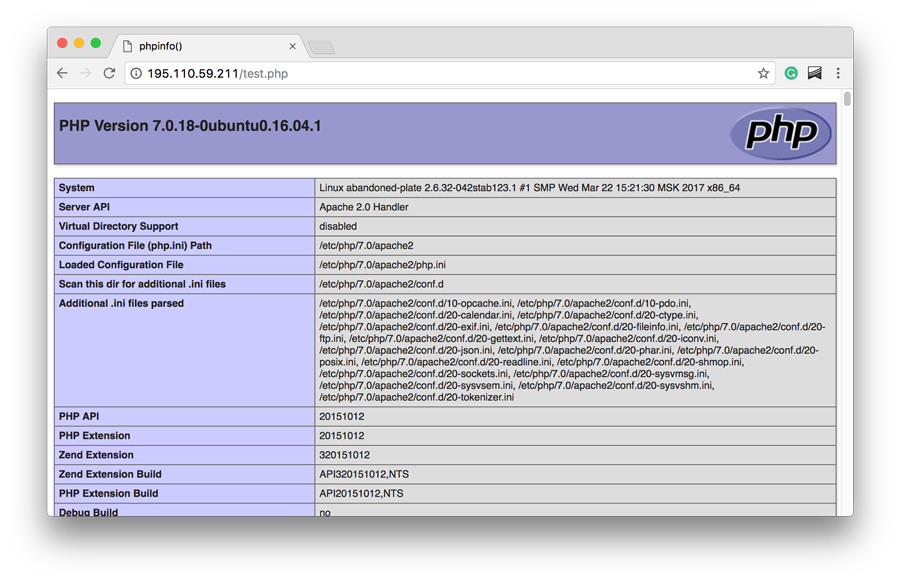
Once installed, check whether PHP is working correctly by creating a test file and opening it in your web browser. Begin by installing the nano text editor, which we will use to create the mockup script:
sudo apt-get install nano
Once installed, enter the following command to create a blank test PHP file and open the nano text editor:
sudo nano /var/www/html/test.php
Note that we created the file inside the /var/www/html directory known as webroot. Apache will look for files requested in the website URL in this folder by default. Check out the Apache Ubuntu documentation page for information about the path configuration.
Also, since you need root privileges to write to this directory, ensure to add sudo before the command. Once the text editor shows up, enter the following:
<?php

phpinfo();

?>
This phpinfo() function will display information about PHP installation and configuration, ensuring it works properly.
After adding the code, save the changes by pressing Ctrl + X → Y → Enter. Now open the following web address in your browser. Remember to use your server’s actual IP address.
http://<your_vps_ip_adress>/test.php
You should see a page that looks similar to the image below.
After confirming that your server’s PHP works correctly, return to Terminal and remove the test file by entering the following command:
sudo rm /var/www/html/test.php
Important! It is crucial to remove the test file after checking installation because it can expose critical information about the server configuration for cyber attackers.
Conclusion
LAMP stands for Linux, Apache, MySQL, and PHP, or LAMP, a popular web stack for creating and deploying applications. It provides a complete hosting infrastructure, including a web server, database, and a PHP interpreter.
The easiest way to install LAMP on Ubuntu is using Hostinger’s operating system template. To do so, log in to hPanel and open your VPS operating system configuration menu. Select Ubuntu 22.04 with LAMP stack and click Change OS.
You can also install LAMP manually by running the apt install command for each software via SSH. To check if it’s configured properly, use systemd to check Apache and MySQL status. For PHP, create a test file using nano and access it via your web browser.
Learn What Else Your Ubuntu Can Do
How to Install Yarn on Ubuntu
How to Install Git on Ubuntu
How to Install Maven in Ubuntu
How to Install Python Pip on Ubuntu
How to Install Tomcat on Ubuntu
How to Install Jenkins on Ubuntu
How to Check Ubuntu Version
How to Install Java on Ubuntu

Prithviraj is a cybersecurity expert that loves a challenge. When he's not managing servers and fixing security flaws, he writes about it on various blogs.

Aris is a Content Writer specializing in Linux and WordPress development. He has a passion for networking, front-end web development, and server administration. By combining his IT and writing experience, Aris creates content that helps people easily understand complex technical topics to start their online journey. Follow him on LinkedIn.

Comments
September 30 2017
Nice tutorial!
November 22 2018
Thanks!